Building a Queen-Size Wood Bed Frame: A Comprehensive Guide to Crafting a Sturdy and Stylish Masterpiece
Creating your own queen-size wood bed frame is a rewarding project that combines functionality with aesthetics. This detailed guide will lead you through the essential aspects of DIY bed frame construction, empowering you to craft a custom centerpiece for your bedroom.
Choosing the Right Materials
Selecting high-quality materials is crucial for durability and longevity. For the frame, choose a hardwood such as oak, maple, or walnut. These woods are strong, resistant to warping, and visually appealing. For the slats, consider using plywood or MDF (medium-density fiberboard) for their stability and affordability.
Designing the Bed Frame
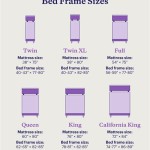
Determine the desired dimensions of your bed frame based on the size of your mattress. The standard queen-size mattress measures approximately 60 inches wide by 80 inches long. Consider adding a slight overhang for a more elegant look. Draw out a detailed plan, including the dimensions and joining techniques you intend to use.
Building the Rails
The rails form the sides and footboard of the bed frame. Cut the rails to the appropriate length and width. Use sturdy joinery techniques such as mortise-and-tenon joints or pocket holes to secure the rails together. Ensure the joints are tight and reinforced with wood glue.
Creating the Slats
Cut the plywood or MDF into slats that are slightly wider than the rails. Mark the desired spacing for the slats and attach them to the rails using screws or nails. Ensure the slats are evenly spaced and support the mattress adequately.
Assembling the Frame
Once the rails and slats are complete, assemble the bed frame. Lay out the rails and slats in the desired configuration and begin joining them. Use screws, nails, or bolts to secure the components firmly. Double-check the alignment and ensure the frame is square and level.
Finishing Touches
Sand the bed frame to remove any rough edges or splinters. Apply a wood stain or paint to enhance the appearance and protect the wood. You can also add embellishments such as molding or carvings to create a unique and personalized touch.
Tips for Success
- Use a level to ensure the frame is even and stable.
- Pre-drill holes before driving screws or nails to prevent splitting.
- Countersink the screws or nails slightly to create a smooth surface.
- Reinforce the joints with L-brackets or metal plates for added strength.
- Allow the stain or paint to dry completely before using the bed frame.
Conclusion
Building a queen-size wood bed frame is a fulfilling and rewarding endeavor. By following this comprehensive guide, you can create a sturdy, stylish, and custom-tailored piece that will enhance your bedroom decor for years to come. Embrace the satisfaction of crafting your own furniture and add a touch of personal flair to your home.

Diy Bed Frame Plans How To Make A With Pete

Diy Bed Frame Wood Headboard 1500 Look For 200 A Piece Of Rainbow

Diy Bed Frame Wood Headboard 1500 Look For 200 A Piece Of Rainbow
:max_bytes(150000):strip_icc()/apieceofrainbow-a4ac6d2cd6dc4b9694e33e80592b797f.jpg?strip=all)
21 Diy Bed Frames You Can Build Right Now

Diy Full Or Queen Size Storage Bed Shanty 2 Chic

Diy Bed Frame Wood Headboard 1500 Look For 200 A Piece Of Rainbow

Essential Platform Bed Frame Ana White
:max_bytes(150000):strip_icc()/vivaveltoro-d12538d3f4da4aa38e620f5b394d5bea.jpg?strip=all)
21 Diy Bed Frames You Can Build Right Now

Simple Queen Bed Frame Diy Plans

Diy 5 Minutes Bed Frame


