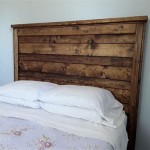
How to Replace the Air Chamber on a Sleep Number Bed
Sleep Number beds, known for their adjustable firmness and personalized comfort, rely on air chambers to provide support. Over time, these air chambers can wear out, resulting in leaks, uneven firmness, or a decrease in overall comfort. When this happens, replacing the air chamber is necessary to restore your sleep experience. This comprehensive guide provides a step-by-step process for replacing an air chamber on a Sleep Number bed, ensuring a smooth and successful replacement.
Step 1: Identify the Air Chamber
Begin by identifying the specific air chamber that needs replacement. Most Sleep Number beds have separate air chambers for each side, making it crucial to pinpoint the affected side. Visually inspect the chamber, noting any signs of wear and tear, punctures, or leaks. Additionally, check for any visible damage to the air chamber's fabric or seams.
Step 2: Gather Necessary Tools and Materials
Before starting the replacement process, gather the following tools and materials: *
New Air Chamber:
Ensure you have the correct air chamber for your Sleep Number bed model. Contact Sleep Number customer support for guidance on selecting the appropriate replacement. *Screwdriver:
A Phillips-head screwdriver will be needed for most Sleep Number bed models. *Air Compressor:
A small, portable air compressor will help inflate the new air chamber quickly and efficiently. *Cleaning Supplies:
A damp cloth and mild cleaning solution will be helpful for cleaning the bed frame and air chamber connections. *Work Gloves:
Protect your hands by wearing work gloves during the replacement process. *Optional: Assistance:
Having an extra pair of hands can make the process easier, especially when removing or securing the air chamber.Step 3: Prepare the Bed
Prepare the bed for the replacement process by following these steps: *
Remove Bedding:
Strip the bed of all bedding, including sheets, blankets, and pillows. *Deflate Air Chamber:
Locate the air chamber valve and carefully deflate the affected air chamber. *Disconnect Power:
Unplug the Sleep Number bed from the power outlet to prevent any electrical hazards during the replacement. *Remove Bed Base:
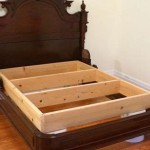
Depending on the bed model, you might need to remove the base or headboard to gain easier access to the air chamber. Consult your Sleep Number user manual for specific instructions.Step 4: Remove the Old Air Chamber
Carefully remove the old air chamber by following these steps: *
Locate Fasteners:
Identify the fasteners securing the air chamber to the bed frame. These are typically screws or clips located along the sides or bottom of the chamber. *Unscrew or Unclip:
Use the screwdriver to remove the screws or carefully unclip the fasteners, ensuring they are properly taken out and stored in a safe place. *Disconnect Air Hose:
Carefully detach the air hose connecting the air chamber to the bed's control unit. *Lift Out Air Chamber:
Once the fasteners are removed and the hose is disconnected, gently lift out the old air chamber from the bed frame. *Dispose of Old Chamber:
Discard the old air chamber according to local recycling guidelines.Step 5: Install the New Air Chamber
Install the new air chamber by following these steps: *
Clean Connections:
Wipe down the air chamber connection points on the bed frame and the new air chamber using the cleaning supplies. *Position New Chamber:
Carefully align the new air chamber within the bed frame, ensuring it sits correctly and securely. *Connect Air Hose:
Attach the air hose from the bed's control unit to the new air chamber, making sure the connection is tight and secure. *Secure Fasteners:
Reattach the fasteners securing the new air chamber to the bed frame, using the screwdriver or clips. Ensure all fasteners are securely tightened.Step 6: Inflate the New Air Chamber
Inflate the new air chamber using the air compressor by following these steps: *
Plug in Compressor:
Connect the air compressor to a power outlet. *Attach Air Hose:
Connect the air compressor's hose to the air chamber valve. *Inflate to Desired Firmness:
Use the air compressor to inflate the new air chamber to your desired firmness level, following the instructions provided with your Sleep Number bed. *Disconnect Compressor:
When the air chamber reaches the desired firmness, disconnect the compressor from the air chamber valve.Step 7: Reassemble the Bed
Once the new air chamber is installed and inflated, reassemble the bed by reversing the steps taken in Step 3. Ensure the bed is properly secured and all components are in their correct positions.
Replacing an air chamber on a Sleep Number bed requires some patience and attention to detail. By carefully following these instructions, you can successfully complete the replacement process and restore your bed's comfort and support. Remember to consult your Sleep Number user manual for specific instructions and recommendations related to your bed model.

Air Chambers For Sleep Number Beds Bed Repair Man

How To Disconnect And Reconnect Air Hoses Sleep Number

Replacing The Air Chambers In A Conventional Sleep Number Bed

How To Disconnect And Reconnect Air Hoses Sleep Number

Traditional Air Chamber Sleep Number

How To Disconnect And Reconnect Air Hoses Sleep Number

Airpro Air Chambers For Sleep Number Beds Bed Repair Man

How To Put A Sleep Number Bed Together The Judge

Air Bed Leak Repair Kit For Sleep Number Beds Man

How To Fix Air Loss In A Sleep Number Bed