How to Cut a Bunk Bed in Half
Transforming a bunk bed into two separate beds can be a practical solution for a variety of situations. Perhaps your children have grown out of sharing a room, or you need to free up space in a smaller bedroom. Cutting a bunk bed in half allows you to repurpose the existing furniture, saving money and reducing waste. However, this project requires careful planning and execution to ensure safety and stability. This guide provides a detailed step-by-step process for cutting a bunk bed in half, highlighting key safety precautions and considerations.
1. Assessing the Bunk Bed and Planning the Cut
Before diving into the cutting process, a thorough assessment of the bunk bed is crucial. This involves understanding the bed's construction, materials, and overall condition.
Examine the Frame: Visually inspect the bunk bed's frame, paying attention to the type of wood used, the thickness of the slats, and the presence of any metal or plastic components. Note any signs of damage, such as cracks or warping.
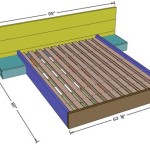
Identify the Cut Location: Determine the ideal location for the cut. Ideally, the cut should be made at a point where the structural integrity of the bed won't be compromised. This is often at the center of the frame, ensuring a balanced and stable end product.
Consider the Mattress Size: Ensure the cut creates two bed frames that can accommodate the existing mattresses or desired new mattresses.
Safety First: Wear appropriate safety gear, including protective eyewear and gloves, during the cutting process. This will protect you from flying debris and sharp edges.
2. Preparing the Bunk Bed for Cutting
Proper preparation is key to a successful cutting process.
Disassemble the Bunk Bed: Carefully disassemble the bunk bed, removing any screws, bolts, or other fasteners. This will make the cutting process easier and safer.
Secure the Frame: Once the bunk bed is disassembled, secure the frame you will be cutting to a sturdy workbench or sawhorses. Ensure the surface is large enough to accommodate the bed's length and provide a stable cutting platform. This will help to prevent the frame from moving during the cutting process.
Measure and Mark: Using a tape measure and a pencil, carefully mark the cut line on the frame. Ensure the line is straight and runs precisely where you intend to cut. You can double-check the accuracy of your markings by using a level to make sure the line is perfectly straight.
3. Cutting the Bunk Bed Frame
The chosen saw will determine the best cutting method.
Cutting with a Circular Saw: For a clean, precise cut, a circular saw is a suitable option. Clamp a straight edge, such as a piece of plywood, to the frame along the marked cut line. Align the circular saw blade with the edge of the straight edge. Slowly and carefully guide the saw along the cut line, ensuring a smooth and controlled movement.
Cutting with a Reciprocating Saw: If using a reciprocating saw, use a blade with a fine-tooth design. This will help to minimize tear-out and achieve a clean cut. The saw's movement should be steady and controlled, following the marked line.
Cutting with a Jigsaw: For intricate cuts or curved designs, a jigsaw is a helpful tool. A jigsaw offers more maneuverability and can easily follow the curve of the marked cut line. Ensure you use a jigsaw blade suitable for the type of wood being cut.
4. Finishing Touches and Stability
Once the cutting is complete, it's essential to attend to the cut edges and ensure the stability of the newly created beds.
Smoothing Cut Edges: Use sandpaper to smooth the cut edges, removing any sharp or rough areas. This will prevent splinters and improve the overall appearance of the beds.
Reinforcing the Frame: If the cut was made at a point where the structural integrity might be compromised, consider reinforcing the frame with additional bracing or support structures. This helps to maintain the stability and longevity of the new beds.
Reassemble the Beds: Carefully reassemble the beds, using the existing hardware or new hardware if necessary. Once reassembled, inspect each bed to ensure that all the components are securely attached and the frame is stable.
Apply a Protective Finish: To protect the wood and enhance its appearance, consider applying a stain or paint. This will also help to seal the wood, making it more resistant to moisture and wear.

Mydal Bunk Bed To Single Beds Ers

Mydal Bunk Bed To Single Beds Ers

Mydal Bunk Bed To Single Beds Ers

Bed Frame Chop

I M A Mum My Boys Were Stuck In Bunkbeds Decided To Cut Them Half Divide The Room For Free Using What Had Sun

Pin En Loft Bed

Mum Reveals Genius Way She Cut Kids Bedroom In Half To Save Space Now Other Pas Are Desperate Give It A Go The Sun

Cutting Bunkbed In Half Tiktok Search

Upcycling Mydal Bunk Bed To 2 Single Beds Easy Diy Tutorial

Halfbunked Ers Diy Bunk Bed Bookshelves Shelves In Bedroom