How To Build A Simple Loft Bed
Building a loft bed can be a rewarding project, providing extra space and a unique sleeping arrangement. This guide outlines the steps to construct a basic, sturdy loft bed suitable for a single mattress. Careful planning and precise execution are crucial for a safe and functional outcome. Always prioritize safety and ensure the design is appropriate for the intended user and location.
Planning and Preparation
Before beginning construction, thorough planning is essential. This involves determining the dimensions, gathering necessary materials, and preparing the workspace.
- Measure the Space: Accurately measure the available space, considering ceiling height, wall placement, and any obstructions. This will determine the maximum dimensions of the loft bed.
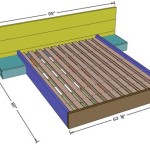
- Design the Bed: Sketch a design, detailing the dimensions of the frame, support beams, ladder, and guardrails. Factor in the mattress size and the desired height beneath the loft.
- Create a Materials List: Based on the design, compile a detailed list of lumber, hardware, and tools required. Choose lumber appropriate for the weight it will bear. Typically, 4x4 posts, 2x6 boards for the frame, and 2x4s for support and ladder construction are recommended.
- Gather Tools: Assemble the necessary tools, including a saw, drill, measuring tape, level, screws, bolts, sandpaper, and safety glasses.
- Prepare the Workspace: Clear a well-ventilated workspace with ample room to maneuver lumber and assemble the bed.
Constructing the Frame
The frame provides the foundational structure of the loft bed. Accuracy in this stage is critical for stability.
- Cut the Lumber: Cut the 4x4 posts and 2x6 frame boards to the specified lengths according to the design. Double-check measurements before cutting.
- Assemble the Side Frames: Connect the 4x4 posts to the 2x6 frame boards using strong screws or bolts. Ensure the corners are square and the connections are secure.
- Attach the End Frames: Secure the two side frames together using the remaining 2x6 frame boards, creating a rectangular box. Reinforce the corners with metal brackets for added stability.
Adding Support Beams
Support beams provide crucial reinforcement for the mattress platform and prevent sagging.
- Cut Support Beams: Cut 2x4s to the length required to span the width of the frame. The number of support beams will depend on the size of the bed and the weight capacity desired.
- Attach Support Beams: Securely attach the support beams to the inside of the frame using screws or bolts. Ensure they are evenly spaced and level.
Building the Mattress Platform
The mattress platform creates a stable and comfortable surface for the mattress.
- Cut Platform Boards: Cut plywood or other suitable material to fit within the frame, resting on the support beams.
- Attach Platform Boards: Secure the platform boards to the support beams using screws. Ensure the surface is smooth and even.
Building the Ladder
A safe and sturdy ladder is essential for accessing the loft bed.
- Cut Ladder Stiles and Rungs: Cut 2x4s for the ladder stiles (sides) and rungs. The angle of the ladder should be comfortable for climbing.
- Assemble the Ladder: Attach the ladder rungs to the stiles using screws or bolts. Ensure the rungs are evenly spaced and securely fastened.
- Attach the Ladder to the Frame: Securely attach the ladder to the frame using bolts and metal brackets. Ensure it is firmly attached and can support the weight of a person climbing.
Installing Guardrails
Guardrails are crucial for safety, preventing falls from the loft bed.
- Cut Guardrail Posts and Rails: Cut 2x4s for the guardrail posts and rails. The height of the guardrails should be sufficient to prevent falls.
- Assemble the Guardrails: Attach the guardrail rails to the posts using screws or bolts. The spacing between rails should be narrow enough to prevent a child from passing through.
- Attach Guardrails to the Frame: Securely attach the guardrails to the frame using bolts and metal brackets. Ensure they are firmly attached and can withstand pressure.
Finishing Touches
Finishing steps contribute to the overall appearance and longevity of the loft bed.
- Sanding: Sand all surfaces smooth to remove any splinters or rough edges.
- Finishing: Apply paint or sealant to protect the wood and enhance the appearance.

How To Build A Loft Bed Jenna Sue Design

Diy Loft Bed Plans Fix This Build That
:max_bytes(150000):strip_icc()/camp-loft-bed-58f6450a3df78ca159f3fc8f.jpg?strip=all "14 Free Diy Loft Bed Plans For Kids And S")
14 Free Diy Loft Bed Plans For Kids And S

How To Build A Loft Bed Free Plans Joinery Design Co

Making A Diy Loft Bed With Desk Pro Tool Reviews
:max_bytes(150000):strip_icc()/twofeetfirst-eb43bf70e1ff4b3fae2df3bba6c4552a.jpg?strip=all "14 Free Diy Loft Bed Plans For All Ages")
14 Free Diy Loft Bed Plans For All Ages
:max_bytes(150000):strip_icc()/afloat-loft-bed-57a2058d5f9b589aa9dc2d97.PNG?strip=all "14 Free Diy Loft Bed Plans For Kids And S")
14 Free Diy Loft Bed Plans For Kids And S
:max_bytes(150000):strip_icc()/refreshliving-bb22e3f46bd04e7faa566ec5d708c60d.jpg?strip=all "14 Free Diy Loft Bed Plans For All Ages")
14 Free Diy Loft Bed Plans For All Ages

How To Build A Loft Bed Easy Step By Building Guide

How To Build A Loft Bed Ana White