Building a Queen Platform Bed Frame: A Step-by-Step Guide
Constructing a queen platform bed frame offers a fulfilling DIY project and a unique, personalized addition to your bedroom. This guide will walk you through the necessary steps, providing an overview of the process and materials required. Whether you're seeking a modern, minimalist aesthetic or a more traditional design, this project allows for creative freedom and customization.
1. Gathering Materials and Tools
The first step is to gather the necessary materials and tools. This list may vary depending on the specific design you choose, but generally includes:
- Wood: Select durable lumber like pine, oak, or plywood for the frame, slats, and headboard/footboard. Consider the desired look and budget when choosing wood type.
- Hardware: This includes screws, wood glue, wood filler, and corner brackets for structural support.
- Tools: Essential tools include a measuring tape, saw (circular or miter saw), drill, sander, and a level.
- Finishing Materials: Stain, paint, or varnish to achieve your preferred finish.
Before starting, carefully review the plans and ensure you have all necessary materials and tools on hand. This will make the construction process smoother and prevent interruptions.
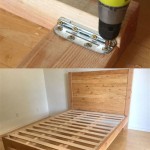
2. Cutting and Assembling the Frame
Once the materials are ready, you can start building the frame. This process involves cutting the lumber to size and assembling the individual pieces.
- Cutting the Lumber: Use a saw to cut the wood according to the dimensions specified in your chosen plans. Accurate measurements are crucial for a structurally sound frame.
- Assembling the Base: Connect the side rails and head/footboard pieces using corner brackets and wood screws for stability. Apply wood glue for added adhesion. Secure the frame to the floor using lag screws.
- Installing the Slats: Cut and install the slats, typically spaced about 12 inches apart for optimal support and airflow. These can be attached directly to the frame or secured within pre-drilled holes.
Take your time and carefully assemble the frame, ensuring all joints are secure and level. This meticulous approach will result in a robust and stable platform bed.
3. Finishing Touches
After the frame is assembled, you can personalize it with finishing touches. This stage involves sanding, filling any gaps or imperfections, and applying a final finish.
- Smoothing the Surface: Sand the entire frame using progressively finer grit sandpaper to achieve a smooth finish. This will also prepare the surface for the final coating.
- Filling Imperfections: Fill any gaps or holes using wood filler. Allow the filler to dry completely before sanding for a seamless appearance.
- Applying the Final Finish: Apply a stain, paint, or varnish according to your desired aesthetic and the type of wood you used. Multiple coats might be needed for optimal coverage and protection.
The final step is to allow the finish to dry completely before adding the mattress and any desired accessories. This process requires patience and attention to detail, ensuring the bed frame is both aesthetically pleasing and durable.

How To Build A Modern Platform Bed For 125 Diy Beautify Creating Beauty At Home

Essential Platform Bed Frame Ana White

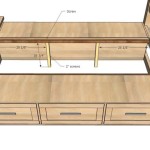
Diy Full Or Queen Size Storage Bed Shanty 2 Chic

Diy Bed Frame Wood Headboard 1500 Look For 200 A Piece Of Rainbow

Diy Bed Frame Wood Headboard 1500 Look For 200 A Piece Of Rainbow
:max_bytes(150000):strip_icc()/buildsomething-d9182ea947314a8dbbba2bc9f0708019.jpg?strip=all "14 Free Diy Platform Bed Plans")
14 Free Diy Platform Bed Plans

Plans Queen Size Bed Plan Project Small Wood Projects From Scrap Frame Diy

How To Build A L Shaped Desk Mid Century Modern Diy Builds

Essential Platform Bed Frame Ana White

How To Build An Easy Bed Platform Maker Gray