DIY Queen Bed Frame with Headboard: A Step-by-Step Guide
Creating a custom bed frame with a headboard is an excellent way to personalize your bedroom and add a touch of your unique style. This project can be surprisingly manageable, even for those with limited woodworking experience. With careful planning and the right tools, you can build a sturdy and stylish queen bed frame that complements your décor perfectly. This guide will walk you through the process, providing detailed instructions and tips for success.
Step 1: Gathering Materials and Tools
Before you begin, gather all the necessary materials and tools. This will ensure a smooth and efficient construction process. You'll need:
- Wood: Choose sturdy lumber like pine, oak, or maple for the frame's stability. You'll need wood for bed rails, legs, headboard support beams, and headboard panels.
- Hardware: Purchase screws, wood glue, corner brackets, and dowels for assembly. Choose screws that are long enough to penetrate the wood fully.
- Tools: Collect a tape measure, pencil, saw (circular or miter), drill, screwdriver, level, and sandpaper. Having a table saw and a drill press would be beneficial but not necessary for this project.
- Optional: Consider purchasing wood stain or paint to enhance the appearance of the bed frame.
Step 2: Cutting the Wood
Precise cutting is crucial for building a sturdy and aesthetically pleasing bed frame. Use a table saw or miter saw to cut the lumber to the following dimensions:
- Two bed rails: Each should be the length of your desired mattress plus 2 inches on each side for overhang.
- Four bed legs: Based on your desired bed frame height, cut four pieces of wood for the legs.
- Two headboard support beams: These should be the width of your mattress and the length of the desired headboard height.
- Headboard panels: Depending on your design, cut multiple panels of wood to create the desired shape and size for the headboard.
Double-check your measurements before cutting to avoid costly mistakes. Remember to consider any additional materials you might need for decorative elements or embellishments.
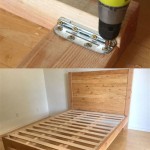
Step 3: Assembling the Bed Frame
With the wood cut, it's time to assemble the basic bed frame. This includes attaching the legs to the rails, creating a strong and supportive structure.
- Pre-drill holes for screws before attaching the legs to the rails. This will prevent the wood from splitting.
- Use wood glue and screws to secure the legs at each corner of the rails, ensuring that the corners are square and that the legs are level.
- Check for stability and adjust the position of the legs accordingly.
- Once you're satisfied, secure the frame further using corner brackets for additional support and sturdiness.
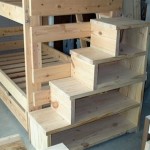
Step 4: Creating the Headboard
Now it's time to assemble the headboard. This involves attaching the headboard panels to the support beams, which will then be attached to the bed frame.
- Attach the headboard panels to the support beams using wood glue and screws, ensuring the seams align and the panels are level.
- Optionally, you can use dowels for a more secure and visually appealing connection between the panels and the support beams.
- Once the headboard is assembled, attach it to the upper part of the bed frame using sturdy brackets or screws, making sure the headboard is level and aligned with the bed frame.
Step 5: Finishing Touches
After the bed frame and headboard are assembled, it's time to apply finishing touches. This includes sanding, staining, and painting.
- Sand the entire bed frame to a smooth finish, removing any rough edges or imperfections.
- Apply wood stain according to the manufacturer's instructions, allowing it to dry completely before applying any sealant.
- Paint the bed frame using a brush or roller, applying multiple thin coats for a smooth and even finish. Allow the paint to dry thoroughly before assembling the bed.
Step 6: Final Assembly and Enjoy
Once the finishing touches are complete, it's time to assemble the bed frame and enjoy your creation.
- Place the mattress securely on the bed frame, ensuring it aligns with the edges and sits comfortably on the frame's surface.
- Add a box spring or mattress topper for additional comfort and support.
- Admire your handiwork and enjoy a good night's sleep knowing you built a custom bed frame that perfectly suits your needs and style.
Building your own queen bed frame with a headboard offers a sense of satisfaction and allows you to personalize your bedroom. By following this guide and taking your time, you can create a sturdy, stylish, and unique bed frame that will last for years to come.

Diy Bed Frame Wood Headboard 1500 Look For 200 A Piece Of Rainbow

Diy Bed Frame Wood Headboard 1500 Look For 200 A Piece Of Rainbow

Diy Bed Frame Wood Headboard 1500 Look For 200 A Piece Of Rainbow

Diy Bed Frame Wood Headboard 1500 Look For 200 A Piece Of Rainbow
:max_bytes(150000):strip_icc()/apieceofrainbow-a4ac6d2cd6dc4b9694e33e80592b797f.jpg?strip=all "21 Diy Bed Frames You Can Build Right Now")
21 Diy Bed Frames You Can Build Right Now

Easy To Build Diy Bed Houseful Of Handmade

Diy Bed Frame Wood Headboard 1500 Look For 200 A Piece Of Rainbow

Easy To Build Diy Bed Houseful Of Handmade
:max_bytes(150000):strip_icc()/diycandy-97114db35d884d62b464a51cd9e1e9f9.jpg?strip=all "21 Diy Bed Frames You Can Build Right Now")
21 Diy Bed Frames You Can Build Right Now
:max_bytes(150000):strip_icc()/vivaveltoro-d12538d3f4da4aa38e620f5b394d5bea.jpg?strip=all "21 Diy Bed Frames You Can Build Right Now")
21 Diy Bed Frames You Can Build Right Now