DIY Queen Loft Bed: A Guide to Building Your Dream
A queen loft bed is a fantastic way to maximize space and create a unique and stylish bedroom. By elevating the bed frame, you can create valuable floor space underneath for a desk, storage, a seating area, or even a small library. Building a DIY queen loft bed allows you to customize it to fit your specific needs and preferences, ensuring that it perfectly complements your bedroom decor and functionality. This guide will provide you with a comprehensive overview of the process, from planning to construction, to help you successfully build your dream loft bed.
Planning Your Queen Loft Bed
Before you start building, careful planning is essential. This involves considering several factors, including:
- Dimensions: Measure the available space in your bedroom to determine the maximum dimensions of your loft bed. Consider the width and length of a queen-sized mattress, as well as the height of the bed frame, including the space required for stairs or a ladder.
- Style: Decide on the design and style of your loft bed. Will it have a modern, minimalist look or a traditional, more ornate design? Consider the overall aesthetic of your bedroom and choose a style that complements it.
- Materials: Select the materials for your loft bed based on your budget and desired look. Wood is a popular choice for its durability and versatility, but you can also opt for metal or a combination of materials.
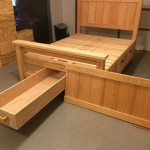
- Functionality: Consider how you want to use the space underneath the loft bed. Will it be a desk area, storage space, a seating area, or a combination of these?
- Safety: Ensure that the loft bed is safe and stable by using sturdy materials and reinforcing critical components such as the bed frame supports and stairs or ladder.
Once you have a clear understanding of your requirements, you can create a detailed plan, including sketches or drawings, to guide you through the building process.
Construction: Building Your Queen Loft Bed
Now that you have a plan in place, you can begin the construction process. Here's a step-by-step guide:
Step 1: Gather Materials and Tools
Make sure you have all the necessary materials and tools before you start building. This includes:
- Wood: Choose sturdy lumber for the bed frame, supports, stairs, and any other necessary components.
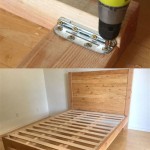
- Hardware: This includes screws, bolts, nuts, washers, hinges, brackets, and corner braces to assemble the bed frame.
- Safety equipment: Consider using safety glasses, gloves, and ear protection while working with power tools.
- Power tools: Necessary tools include drills, saws, sanders, and a measuring tape.
- Paint or stain: You can customize the look of your loft bed by painting or staining it after it's assembled.
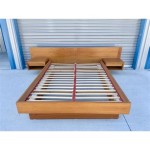
Step 2: Assemble the Bed Frame
Start by assembling the main bed frame, which will support the mattress. Follow your plan carefully, ensuring that all cuts are accurate and the connections are secure. Use the appropriate hardware and construction techniques to create a robust and stable frame.
Step 3: Build the Stairs or Ladder
Next, create the stairs or ladder for accessing the loft bed. If you're building stairs, make sure they are wide and comfortable to climb. You can use pre-made steps or build your own using wood. For a ladder, choose sturdy materials and make sure the rungs are secure.
Step 4: Install the Support Structure
The support structure underneath the bed platform is crucial for stability. Build it using strong wood beams or metal supports, and securely attach it to the bed frame and the floor. Ensure that the support structure is strong enough to withstand the weight of the mattress and the person using the bed.
Step 5: Install the Bed Platform
Once the support structure is in place, you can install the bed platform. This is the surface that the mattress will rest on. Use sturdy wood planks or plywood and secure them to the support structure.
Step 6: Finish the Project
Once the loft bed is assembled, you can finish it by sanding down any rough edges and applying paint, stain, or varnish to your liking. This will add a final touch and protect the wood from wear and tear.
Safety Considerations
Safety is paramount when building a loft bed. Ensure that the design is stable, using strong materials and construction techniques. Include safety features like handrails on the stairs or ladder, and consider adding a side rail to prevent accidental falls from the bed. Additionally, inspect the loft bed for any weaknesses or loose connections before use.
Conclusion
Building a DIY Queen Loft Bed is a rewarding project that can transform your bedroom. By following these guidelines and incorporating your personal style, you can create a unique and functional piece of furniture that adds value and personality to your home. Remember, safety should always be a priority, so take your time, plan carefully, and ensure your loft bed is sturdy before using it.

How To Build An Easy Diy Queen Size Loft Bed For S Thediyplan

Diy Full Size Loft Bed For S With Plans To Build Your Own Simplified Building

Free Diy Furniture Plans How To Build A Queen Sized Low Loft Bunk Bed The Design Confidential

Queen Loft Bed Plans

How To Build An Easy Diy Queen Size Loft Bed For S Thediyplan

Diy Queen Loft Bed Frame Plans Rannels Rustic Log Build A Beds Murphy

17 Easy Steps For A Diy Built In Bunk Bed Start At Home Decor

Loft Bed Build Diy 120 Dollars Queen Size

How To Build A Diy Queen Size Loft Bed With Desk Thediyplan

How To Build A Loft Bed Free Plans Joinery Design Co