Homemade Headboards for Queen Beds: A DIY Guide
Transforming a bedroom into a haven of comfort and style often involves meticulous attention to detail, and the headboard plays a pivotal role in achieving this. A well-designed headboard can elevate the aesthetic appeal of a queen bed, creating a focal point that sets the tone for the entire space. While purchasing a pre-made headboard is an option, crafting one at home offers the opportunity to unleash creativity, tailor the design to individual preferences, and potentially save money. This guide will delve into the process of creating homemade headboards for queen beds, providing practical insights and inspiration for embarking on this rewarding DIY endeavor.
Choosing the Right Materials
The first step in crafting a homemade headboard is selecting the right materials. The choice of material will significantly influence the headboard's appearance, durability, and overall style. Some popular options include:
- Wood: Wood remains a timeless and versatile material for headboards, offering a range of textures and finishes. From rustic reclaimed wood to sleek plywood, wood provides a solid foundation for various designs. Pine, oak, and cedar are commonly used woods, each possessing unique characteristics.
- Upholstery Fabric: For a plush and inviting headboard, fabric is an excellent choice. Upholstery fabrics like velvet, linen, or cotton can be stretched over plywood or foam, creating a comfortable and stylish headboard. Consider the fabric's texture, color, and durability before making a selection.
- Metal: Metal headboards offer a contemporary and industrial aesthetic. Steel, iron, or aluminum can be used to create sleek and minimalist designs, or intricate patterns for a more dramatic look. Metal can be painted or left unfinished for a raw, industrial feel.
- Other Creative Materials: Beyond traditional materials, explore unconventional options like reclaimed pallets, vintage doors, or even woven wicker for a truly unique headboard. These materials can add character and a touch of individuality to the bedroom.
Designing the Headboard
With materials in mind, it's time to design the headboard. Consider the following factors:
- Style: The style of the headboard should complement the overall design of the bedroom. Choose a style that aligns with your personal taste and the existing furniture. Consider options like traditional, modern, minimalist, or eclectic.
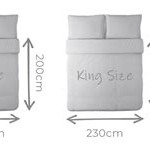
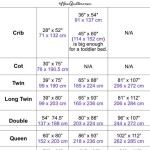
- Size: The headboard should be appropriately sized for the queen bed. Typically, queen headboards range from 54 to 60 inches wide. Measure the bed frame carefully to ensure a proper fit.
- Height: The height of the headboard is a matter of personal preference. A taller headboard can create a sense of grandeur and privacy, while a shorter headboard can make the room feel more open.
- Features: Consider incorporating additional features into the design, such as built-in shelves, lighting, or a storage compartment. These features can add functionality and enhance the headboard's appeal.
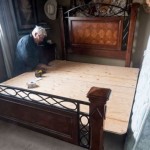
Constructing the Headboard
Once the design is finalized, it's time to construct the headboard. The construction process will vary depending on the chosen materials and design. Here's a general outline:
- Cut and Shape the Materials: Based on the design, cut the chosen materials to the desired dimensions. Use a saw, jigsaw, or other appropriate tools to achieve the required shape.
- Assemble the Frame: If the headboard involves a frame, assemble it using wood glue and screws. Ensure the frame is sturdy and stable for mounting the headboard.
- Attach the Back Panel: Attach the back panel (if applicable) to the frame using screws or nails. Consider adding insulation to the back panel to reduce noise and enhance comfort.
- Upholstering: If using fabric, stretch and staple the fabric over the frame or foam, ensuring it is securely fastened. For a more professional finish, consider using a staple gun and upholstery tacks.
- Finishing Touches: Apply paint, stain, varnish, or other finishes to the headboard to achieve the desired look. Sand the surface before applying any finishes for a smoother result.
Mounting the Headboard
Once the headboard is complete, it needs to be mounted to the wall. The mounting method will depend on the headboard's weight and structure. Some common options include:
- Screws and Anchors: For heavier headboards, use screws and anchors to secure the headboard to the wall studs. Ensure the anchors are rated for the headboard's weight.
- Headboard Brackets: Many headboards come with pre-installed brackets that can be secured to the wall using screws or nails. These brackets provide a sturdy and discreet mounting solution.
- L-Brackets: L-brackets can be attached to the headboard and the wall, offering a stable and secure mounting method. Ensure the L-brackets are strong enough to support the headboard's weight.
Building a homemade headboard for a queen bed is a fulfilling project that allows for personalized expression and creative exploration. By carefully selecting materials, designing the headboard to match the bedroom's aesthetic, and following the construction guidelines, individuals can create a unique and stylish headboard that enhances their sleeping sanctuary. Remember, the key to success lies in meticulous planning, careful execution, and a touch of personal flair.

Easy Build Wood Headboard All Mattress Sizes Ana White

Diy Wooden Headboard With Shelves Bed Bedroom

50 Best Diy Headboard Ideas Upcycled
:max_bytes(150000):strip_icc()/barnwood-door-headboard-from-reclaimed-wood-010-24916b3e0e2d41c4a1ff05fe03fb74bd.jpg?strip=all "41 Diy Headboards You Can Make In A Weekend Or Less")
41 Diy Headboards You Can Make In A Weekend Or Less

15 Diy Headboard Ideas How To Make A

The 47 Best Diy Headboard Ideas For 2024

10 Unique Headboard Ideas That Will Change The Style Of Your Room Inspiration Diy Bed Bedroom

Diy Queen Headboard For 35 Hometalk
:max_bytes(150000):strip_icc()/diy-59f21039054ad90010815556.jpg?strip=all "14 Diy Wood Headboards")
14 Diy Wood Headboards

Diy Barn Door Headboard Shanty 2 Chic
Related Posts