How to Build a Full Over Queen Bunk Bed
A full over queen bunk bed offers a fantastic way to maximize space in a bedroom while providing comfortable sleeping arrangements. This versatile solution is particularly useful for families, guest rooms, or even dorm rooms where space is limited. Constructing a full over queen bunk bed requires careful planning, precise measurements, and a solid understanding of woodworking techniques. This article will guide you through the process, providing detailed instructions and tips to ensure a successful outcome.
Step 1: Gather Your Materials and Tools
Before embarking on the project, it is essential to have all the necessary materials and tools readily available. This will streamline the construction process and ensure a smooth workflow.
- Lumber: Choose high-quality lumber, preferably kiln-dried, for durability and stability. You will need lumber for the frame, slats, and headboard/footboard (if desired). Consider using a combination of 2x4s and 2x6s for the frame, and slats made from 1x2s or 1x4s.
- Hardware: This includes screws, bolts, nuts, washers, corner brackets, dowels, wood glue, and any other fastening components you require. Ensure that the hardware is strong enough to support the weight of the bunk bed.
- Tools: A well-equipped workshop is essential for this project. You will need a circular saw, drill/driver, measuring tape, level, hammer, screwdriver, safety glasses, ear protection, and a work surface.
- Optional: Staining or painting materials, headboard/footboard embellishments, and ladder components.
Step 2: Plan and Design
The success of your bunk bed construction hinges on meticulous planning and design. Take the time to carefully consider the dimensions, features, and overall aesthetic of your desired bunk bed.
- Dimensions: Carefully measure the available space in your bedroom and make sure the bed will fit comfortably. Determine the desired height of the top bunk and the length and width of each bed. Remember to factor in the thickness of the mattress and allow for adequate clearance for the ladder and sitting up in bed.
- Frame: Decide on the frame design. Consider the weight capacity and the overall stability. A sturdy frame is paramount for a safe and functional bunk bed. Consider using strong joints like mortise-and-tenon or pocket hole joinery.
- Ladders: Choose a ladder design that will safely and easily access the top bunk. There are plenty of options available, from simple straight ladder designs to more elaborate styles with handrails. Ensure the ladder is securely attached to the frame and adequately spaced to avoid tripping hazards.
- Headboards and Footboards: Consider adding optional headboards and footboards for a more finished look and added support. These can be designed to match the style of the bedroom.
- Safety: Prioritize safety. Incorporate features like guardrails, a sturdy ladder, and a secure platform to minimize the risk of falls.
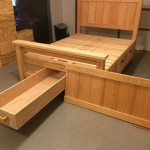
Step 3: Cutting and Assembling the Frame
This step involves cutting the lumber to specific dimensions and assembling the frame. Extreme precision is vital to ensure a well-fitting and stable structure.
- Cutting: Cut the lumber according to your pre-determined measurements. Ensure that all cuts are straight and precise. Use your circular saw for straight cuts and a jigsaw for any curved or intricate shapes.
- Joining: Assemble the frame using strong joint techniques such as pocket hole joinery, mortise-and-tenon, or dovetail joints. Consider using wood glue in conjunction with screws, bolts, or dowels for increased strength.
- Reinforcement: Use corner brackets to strengthen the frame and prevent warping or instability. You may also choose to add additional support beams between the bed frame and the headboard or footboard.
- Slats: Attach the support slats to the frame. Use 1x2s or 1x4s, spaced evenly across the frame, to provide a sturdy base for the mattress.
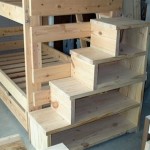
Step 4: Building the Ladder
The ladder is an integral part of the bunk bed. It needs to be strong, stable, and safe for climbing. Consider a design that fits the style of the bunk bed and offers a comfortable climbing experience.
- Design: Choose a simple or intricate design depending on your preference and skill level.
- Construction: Cut the lumber for the ladder rails and steps according to your design. Use pocket holes or dowels to attach the steps to the rails.
- Attachment: Secure the ladder to the frame using screws, bolts, or other robust fastening methods. Ensure that the ladder is securely fixed to the frame to prevent movement.
- Safety: Consider adding handrails or side supports to the ladder for added safety and stability.
Step 5: Finishing Touches
Once the frame and ladders are built, it is time to add some finishing touches. A carefully finished bunk bed will be aesthetically pleasing and enhance the overall visual appeal of the bedroom.
- Sanding: Sand the entire structure to remove any rough edges, splinters, or inconsistencies. Start with coarse grit sandpaper, gradually progressing to finer grits for a smooth finish.
- Painting or Staining: Choose a suitable paint or stain that complements the bedroom décor. Apply multiple coats for a durable and beautiful finish.
- Hardware: Add hardware like screws, bolts, and any decorative elements. Ensure that all hardware is securely tightened and functional.
- Headboard and Footboard: If applicable, attach the headboard and footboard to the frame. You can use screws or pocket holes for this step, depending on your design.
Building a full over queen bunk bed is a challenging but rewarding project. With careful planning, precise measurements, and meticulous construction, you can create a unique and functional piece of furniture. Remember to prioritize safety throughout the process, using sturdy materials and sound construction techniques.

Make Diy Full Over Bunkbed For Your Kids With Free Plans If Only April

17 Easy Steps For A Diy Built In Bunk Bed Start At Home Decor

17 Easy Steps For A Diy Built In Bunk Bed Start At Home Decor

Diy Queen Over Loft Bed Plan Step By Guide For

Modular Bunk Bed Setup Woodworking Blog S Plans How To Diy Cool Beds

Queen Builtin Bunks Reveal Honey Built Home

Woodworking Bunk Bed Plans Full Over Queen Free Beds

Loft Bunk Beds Bunkbeds Com

Diy Built In Bunk Beds Lauren Koster Creative

Diy Built In Bunk Beds With Stairs Old Salt Farm