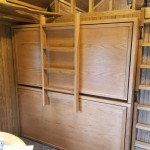
How to Build a Lofted Bed
A lofted bed presents a unique and functional solution for maximizing space in a bedroom. They offer the benefit of creating a more airy and spacious atmosphere, while simultaneously providing additional storage or a dedicated workspace underneath. Building a lofted bed can be an exciting DIY project, allowing you to customize the design and materials to suit your preferences and needs. This article will guide you through the process of building a lofted bed, covering essential steps and considerations.
Before embarking on this project, it's crucial to assess your skills and available resources. Building a lofted bed requires some woodworking experience and the ability to utilize tools such as saws, drills, and measuring instruments. Furthermore, ensure you have access to appropriate materials, including lumber, fasteners, and finishing supplies. It’s also wise to gather any necessary safety equipment, such as eye protection, gloves, and dust masks.
1. Planning and Design
The first step in building a lofted bed is to meticulously plan and design the structure. This involves determining the desired dimensions, bed size, and overall style. Consider factors such as ceiling height, available floor space, and the intended use of the space underneath the bed. It's helpful to sketch out a detailed plan, indicating the dimensions and placement of each component, including the bed frame, support beams, and ladder. Once the design is finalized, create a detailed list of materials and tools required for the project.
2. Materials and Tools
The materials needed for building a lofted bed will vary depending on the design and desired level of complexity. However, common materials include:
- Lumber: Choose sturdy and durable wood like pine, oak, or maple. Consider using pre-cut lumber for easier assembly.
- Fasteners: Use screws, nails, and brackets appropriate for the type of lumber chosen. Consider using galvanized fasteners for added durability.
- Hardware: This includes hinges for ladder access, drawer slides for storage, and any other hardware needed for specific design features.
- Finish: Choose paint, stain, or sealant to protect and enhance the appearance of the bed. Consult the lumber supplier for appropriate finishing options.
Essential tools for building a lofted bed include:
- Measuring Tape: Accurate measurements are crucial for successful construction.
- Saw: Choose a circular saw or table saw for cutting lumber to the required dimensions.
- Drill: Use a cordless drill for creating pilot holes and driving screws effectively.
- Level: Ensure all components are level to prevent structural instability.
- Screwdriver: Use a screwdriver or drill driver with appropriate bits for securing fasteners.
- Safety Equipment: Include eye protection, gloves, and dust masks to ensure a safe working environment.
3. Construction
With the materials and tools gathered, the next step is to construct the lofted bed frame. Refer to the previously created plan and follow these steps:
- Cut the lumber to the required dimensions. Ensure accurate measurements and use appropriate cutting techniques.
- Assemble the bed frame, starting with the base for the mattress. Use screws or nails to secure the components together.
- Construct the support beams that will hold the bed frame. Ensure they are strong and adequately spaced to support the weight of the bed and the individual sleeping on it.
- Attach the bed frame to the support beams, creating a sturdy and secure structure. Use appropriate fasteners and reinforce the connections with brackets if necessary.
- Construct the ladder, ensuring it's secure and stable. Use hinges to attach the ladder firmly to the lofted frame.
Once the construction is complete, carefully inspect the structure for any loose connections or potential vulnerabilities. Make any necessary adjustments for a sturdy and secure lofted bed.
4. Finishing Touches
The final step in building a lofted bed is to apply finishing touches to enhance its appearance and protect the wood. Sand the entire structure to create a smooth surface and remove any rough edges. Apply the desired paint, stain, or sealant. Allow ample drying time before proceeding. If incorporating any additional features like storage drawers or shelving, install them securely after the finishing process is complete.
Building a lofted bed can be a rewarding DIY project, offering a unique and functional addition to any bedroom. By carefully planning, gathering the necessary materials and tools, and adhering to the construction steps mentioned above, you can successfully create a customized and practical lofted bed. Remember to prioritize safety throughout the process, wearing appropriate protective gear and using caution when handling power tools.

How To Build A Loft Bed Jenna Sue Design
:max_bytes(150000):strip_icc()/refreshliving-bb22e3f46bd04e7faa566ec5d708c60d.jpg?strip=all "14 Free Diy Loft Bed Plans For All Ages")
14 Free Diy Loft Bed Plans For All Ages
:max_bytes(150000):strip_icc()/camp-loft-bed-58f6450a3df78ca159f3fc8f.jpg?strip=all "14 Free Diy Loft Bed Plans For Kids And S")
14 Free Diy Loft Bed Plans For Kids And S

How To Build A Loft Bed Easy Step By Building Guide

How To Build A Loft Bed Easy Step By Building Guide

Make A Loft Bed Build Your Own Or Bunk

How To Build A Loft Bed Ana White

Diy Full Loft Bed How To Build

How To Build A Full Size Loft Bed Jays Custom Creations

Diy Loft Bed Plans Fix This Build That