How to Build a Queen Bed Frame with Drawers
Building a queen bed frame with drawers is a rewarding project that can enhance both the functionality and aesthetics of your bedroom. This DIY project allows you to design a bed frame tailored to your specific needs and preferences, while potentially saving money compared to purchasing a pre-made option. With careful planning, the right tools, and a bit of patience, you can create a sturdy and stylish bed frame that will serve you well for years to come.
Step 1: Gathering Materials and Tools
Before embarking on the construction process, it's crucial to gather all the necessary materials and tools. This will ensure a smooth and efficient build. Here's a comprehensive list of materials you'll need:
- Wood: Choose sturdy, high-quality wood like pine, oak, or maple. You'll need lumber for the bed frame, drawer sides, drawer bottoms, and headboard/footboard.
- Drawer Slides: Select smooth-operating drawer slides that are compatible with the weight of the drawers you're building. Ball-bearing slides are recommended for optimal performance.
- Hardware: This includes screws, nails, wood glue, hinges, and any decorative hardware you desire for the headboard and footboard.
- Paint or Stain: Choose your preferred finish to match your bedroom decor.
- Sandpaper: Various grits of sandpaper are necessary for sanding the wood and creating a smooth surface for painting or staining.
- Wood Filler: Use wood filler to fill any gaps or imperfections in the wood.
In addition to the materials, you'll need a range of tools for the project. These essential tools include:
- Saw: A circular saw or table saw is ideal for cutting the wood to precise dimensions.
- Drill: A cordless drill with various drill bits is needed for drilling pilot holes and attaching hardware.
- Measuring Tape: Accurate measurements are crucial for ensuring that all components fit together correctly.
- Level: A level is essential for ensuring that the bed frame is built straight and stable.
- Screwdriver: A screwdriver or drill driver is needed for attaching the wood and hardware.
- Clamps: Clamps will help hold pieces of wood together while attaching them with glue or screws.
- Safety Glasses and Hearing Protection: As with any woodworking project, safety should always be a top priority. Wear safety glasses and hearing protection to protect yourself from potential hazards.
Step 2: Planning the Design and Measurements
Before you start cutting wood, take some time to plan out the design and dimensions of your bed frame. Carefully consider the desired height, width, and depth of the frame. It's essential to understand the dimensions of a standard queen mattress (60 inches wide by 80 inches long). Once you have the dimensions, you can create a simple plan or sketch to guide your construction.
Here are some key design considerations:
- Headboard and Footboard: Decide on the design of the headboard and footboard, including their height and whether you want them to be simple or elaborate.
- Drawer Size and Placement: Determine the size of the drawers and how many you want to include. Think about the accessibility and overall functionality of the drawers.
- Support System: Choose a sturdy support system for the mattress, such as wooden slats or a metal frame. Consider the weight of your mattress when selecting the slats.
- Storage Needs: If you need additional storage in your bedroom, consider integrating shelves, baskets, or additional compartments into the design of the bed frame.
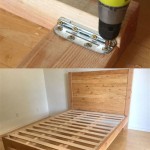
Step 3: Cutting and Assembling the Bed Frame
Once your planning is complete, you can start cutting the wood based on your design. Use a saw to precisely cut lumber to the dimensions you determined in the planning phase. Remember to double-check measurements before making cuts to avoid mistakes. After cutting the wood, begin assembling the bed frame by following these steps:
- Construct the Base: Assemble the base of the bed frame, which typically consists of two side rails and two end rails. Connect these pieces using wood glue and screws for a sturdy foundation.
- Attach the Headboard and Footboard: Attach the headboard and footboard to the end rails of the base. You can use dowels, screws, or a combination of methods for secure attachment.
- Install the Support System: Install the chosen support system for the mattress, whether it be wooden slats or a metal frame. Ensure that the support system is secure and can adequately distribute the weight of the mattress.
- Assemble the Drawers: Build the individual drawers by cutting the sides, front, back, and bottom using your saw. Attach the drawer sides and front to the bottom using wood glue and screws. If needed, use a router to create a smooth finish on the edges.
- Install the Drawer Slides: Install the drawer slides to the sides of the drawers and the corresponding sides of the bed frame. Ensure that the slides are aligned properly to allow the drawers to smoothly extend and retract.
- Attach the Drawers to the Frame: Place the drawers into the bed frame, ensuring they are securely attached to the slides. Test the drawers to ensure they glide smoothly and don't catch on the frame.
Step 4: Finishing Touches
After assembling the bed frame, it's time to give it a polished and professional finish. Here are the final steps to complete your project:
- Sanding: Sand all surfaces of the bed frame using progressively finer grits of sandpaper. This eliminates any rough edges and creates a smooth surface for painting or staining.
- Filling Gaps: Fill any gaps or imperfections in the wood using wood filler. After the filler has dried, sand it smooth to ensure a professional finish.
- Painting or Staining: Apply your chosen paint or stain to the bed frame. Ensure even coverage and allow ample time for the finish to dry. Consider using a primer before applying the paint or stain for a more durable and vibrant finish.
- Adding Hardware: If you're incorporating decorative hardware, like drawer pulls or hinges, attach them to the bed frame and drawers during this step.
Building a queen bed frame with drawers can be a rewarding DIY project that allows you to personalize your bedroom with a unique and functional furniture piece. By following this step-by-step guide and prioritizing safety and precision, you can create a bed frame that will serve you well for years to come. Remember to carefully plan the design, gather necessary materials, and take your time during the construction process. Enjoy the satisfaction of crafting your own custom-made bed frame.

Farmhouse Storage Bed With Drawers Queen Ana White

Queen Size Platform Bed Frame With Storage Drawers Sawdust Girl

Diy Queen Bed Frame With Storage Plans Wilker Do S

Full Size Bed Designs Diy Storage Platform Frame

Farmhouse Storage Bed With Drawer Diy Platform Frame

Brandy Scrap Wood Storage Bed With Drawers Queen Ana White

How To Build A Queen Size Bed With Drawer Storage

Diy Full Or Queen Size Storage Bed Shanty 2 Chic

How To Build A Queen Size Storage Bed Addicted 2 Diy

How To Build A Queen Size Storage Bed Addicted 2 Diy Frame With