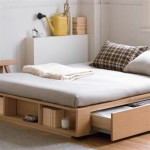
How to Install an Air Chamber in a Sleep Number Bed
Sleep Number beds are known for their adjustable firmness, allowing individuals to customize their sleeping experience. This customization is achieved through air chambers within the mattress, which can be inflated or deflated to suit personal preferences. Installing an air chamber in a Sleep Number bed is a straightforward process, but it requires careful attention to detail to ensure proper function and longevity.
Preparing for Installation
Before installing an air chamber in a Sleep Number bed, it's essential to gather the necessary materials and prepare the workspace. The process typically involves removing the existing mattress cover, accessing the air chamber compartment, and connecting the new chamber to the air pump system. Ensure the following items are readily available:
- New air chamber
- Screwdriver (Phillips head)
- Wrench (if applicable)
- Zip ties (if required)
- Cleaning supplies (mild soap and water)
- A clean, flat surface
Once the necessary materials are gathered, choose a clean, well-lit space to work on. It’s recommended to work on a flat surface, such as a large table or the floor, to facilitate easy access to the underside of the mattress. This step ensures a smooth and efficient installation process.
Installing the Air Chamber
The installation process for an air chamber in a Sleep Number bed can vary slightly depending on the specific model and year of manufacture. However, the general steps remain consistent. Here’s a breakdown of the typical installation procedure:
- Remove the mattress cover: Carefully unzipper or detach the mattress cover to expose the air chamber compartment.
- Locate the existing air chamber: Identify the existing air chamber within the compartment. It will typically be connected to the air pump system.
- Disconnect the existing air chamber: Carefully detach the existing air chamber from the air pump system by unscrewing any securing nuts or disconnecting any quick-release connectors.
- Prepare the new air chamber: Ensure the new air chamber is in good condition and free of any defects. If necessary, clean the connection points with a mild soap and water solution.
- Connect the new air chamber: Align the new air chamber with the air pump system and connect it using the appropriate fasteners or quick-release connectors. Make sure the connection is secure and airtight.
- Secure the air chamber: Use zip ties, screws, or other securing mechanisms to secure the new air chamber within the compartment. Ensure it is stable and does not move freely.
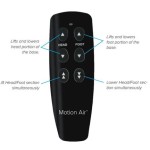
- Reconnect the air pump system: Reconnect the air pump system to the air chamber, ensuring all connections are secure and airtight.
- Test the air chamber: Inflate the new air chamber to test its functionality and check for leaks. Adjust the firmness levels as desired and observe the performance of the chamber.
- Reinstall the mattress cover: Carefully reinstall the mattress cover, ensuring it is properly zipped or secured.
It’s crucial to follow the manufacturer's instructions meticulously while installing the air chamber. Consult the user manual or contact Sleep Number customer support for specific guidance tailored to the model in question. This ensures the correct procedures are followed and any potential complications are avoided.
Troubleshooting Air Chamber Installation
Although installing an air chamber in a Sleep Number bed is generally straightforward, there might be instances where issues arise. It’s essential to be prepared to troubleshoot any problems that may occur during the installation process. Here are some common scenarios and potential solutions:
Leakage
If the air chamber leaks, thoroughly inspect the connections for any loose fittings, cracks, or damage. Retighten any loose connections, replace damaged components, or apply sealant to repair leaks as needed.
Noise
An air chamber might produce noise during operation due to loose fittings, air movement, or vibrations. Check all connections for tightness, adjust the air pressure levels, or use noise-dampening materials to reduce any noise.
Firmness Issues
If the air chamber does not inflate or deflate properly, ensure the connection to the air pump system is secure and clear of any blockages. Check the air pump for proper operation and consider contacting Sleep Number customer support for further assistance.
By addressing these common problems, potential issues during installation can be effectively resolved.

How To Put A Sleep Number Bed Together The Judge

How To Disconnect And Reconnect Air Hoses Sleep Number

How To Put A Sleep Number Bed Together The Judge

How To Disconnect And Reconnect Air Hoses Sleep Number

How To Disconnect And Reconnect Air Hoses Sleep Number

Traditional Air Chamber Sleep Number

How To Put A Sleep Number Bed Together The Judge

Replacing The Air Chambers In A Conventional Sleep Number Bed

Need Help We Re Here For You

How To Disconnect And Reconnect Air Hoses Sleep Number