How to Make a Headboard for a Queen-Size Bed
A headboard can transform the look of your bedroom, adding a touch of elegance and personality. Creating a headboard yourself allows for complete customization, giving you the freedom to express your unique style and design preferences. This guide will walk you through the process of constructing a headboard for a queen-size bed, providing step-by-step instructions and essential tips for a successful project.
1. Planning and Design
Before embarking on the construction process, it's crucial to plan and design your headboard meticulously. Consider the following factors:
- Style: Determine the overall aesthetic you desire for your headboard. Popular styles include traditional, modern, rustic, and minimalist.
- Materials: Select materials that align with your style and budget. Common options include wood, metal, fabric, and even repurposed materials.
- Size and Shape: Measure your queen-size bed frame accurately to ensure the headboard fits perfectly. Decide on the height, width, and shape of the headboard.
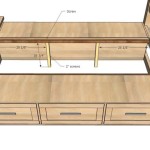
- Features: Consider adding features like shelves, storage compartments, or lighting to enhance functionality.
Once you have a clear vision, create a detailed sketch or blueprint to guide your construction process. This will help you visualize the final product and ensure accuracy.
2. Gathering Materials and Tools
Depending on your chosen design and materials, you'll need a variety of tools and materials. Here's a general list for a wood headboard:
- Wood: Select appropriate wood boards for the headboard frame and any additional components. Consider the thickness, width, and grain pattern for desired aesthetic.
- Wood Glue: Use a high-quality wood glue for strong and durable bonds.
- Screws and Nails: Choose screws and nails that are suitable for the wood thickness and your desired fastening method.
- Sandpaper: Different grit sandpaper will be used for smoothing and finishing the wood surfaces.
- Paint or Stain: Apply a finishing touch with paint or stain to enhance the appearance and protection of the wood.
- Saw: A circular saw or jigsaw is essential for cutting wood pieces to size.
- Drill and Drill Bits: Use a drill to create pilot holes before driving screws and for other drilling needs.
- Level: Ensure all components are level and evenly aligned.
- Clamps: Securely hold pieces together during assembly and while glue dries.
It's essential to have all the necessary materials and tools readily available before starting construction.
3. Construction Process
The construction process can vary slightly depending on the headboard design. Here is a general outline for a simple wooden headboard:
- Cut the Wood: Measure and cut the wood boards for the headboard frame according to your design. Use a circular saw or jigsaw to make accurate cuts.
- Assemble the Frame: Join the wood pieces to form the headboard frame. Use wood glue and screws or nails for secure bonding.
- Attach Additional Components: If your design includes additional components (e.g., shelves, storage compartments), attach these to the frame using appropriate methods.
- Sand and Finish: Smooth out any rough edges and imperfections using sandpaper. Apply paint or stain for a final touch.
- Attach Hardware: If desired, attach hardware (e.g., brackets, mounting plates) for secure installation on your bed frame.
Remember to work carefully and use appropriate safety measures during the construction process. Regularly check for alignment and ensure a strong and stable structure.
4. Installation
Once the headboard is complete, it's time to install it on your bed frame. Here are the general steps:
- Prepare the Bed Frame: Ensure your bed frame is sturdy and ready for the headboard attachment.
- Position the Headboard: Place the headboard against the bed frame, ensuring it's level and centered.
- Attach to Bed Frame: Use the prepared hardware to attach the headboard securely to the bed frame.
Follow the instructions provided with the hardware or consult with a professional for assistance if needed. Ensure a secure attachment for safety and stability.
Creating a custom headboard for your queen-size bed is a rewarding project that allows for personalized style and functionality. With careful planning, appropriate materials, and a methodical approach, you can create a beautiful and unique centerpiece for your bedroom.

15 Diy Headboard Ideas How To Make A

Diy Bed Frame Wood Headboard 1500 Look For 200 A Piece Of Rainbow

Diy Bed Frame Wood Headboard 1500 Look For 200 A Piece Of Rainbow

15 Diy Headboard Ideas How To Make A

Diy Upholstered Wingback Headboard Handmade Weekly

How To Upholster A No Sew Headboard
:max_bytes(150000):strip_icc()/diy-59f21039054ad90010815556.jpg?strip=all "14 Diy Wood Headboards")
14 Diy Wood Headboards

50 Best Diy Headboard Ideas Upcycled

How To Upholster A Headboard For Beginners

Diy Bed Frame Wood Headboard 1500 Look For 200 A Piece Of Rainbow
Related Posts