How to Sew a Queen Size Bedspread
A bedspread, often referred to as a bed cover, is a versatile piece of bedding that not only enhances the aesthetic of your bedroom but also provides an extra layer of warmth and protection for your mattress. While a bedspread can be purchased readily, sewing your own allows for a personalized touch and the freedom to choose specific fabrics, colors, and designs. This guide will walk you through the process of sewing a queen-size bedspread, equipping you with the necessary steps and knowledge to create a custom-made piece that complements your bedroom decor.
1. Materials and Tools
Before embarking on your sewing journey, it's crucial to gather the necessary materials and tools. This will ensure a smooth and efficient sewing process. Here's a list of essential items:
- Fabric: Choose a fabric that suits your preferences and meets your desired qualities. Consider factors such as weight, texture, and ease of care. Popular options include cotton, linen, velvet, or microfiber. Opt for a fabric with a width of at least 60 inches to accommodate the queen-size bedspread dimensions.
- Thread: Select a thread that complements your fabric color and provides adequate strength. Polyester thread is a durable option that can withstand frequent washing and use.
- Sewing Machine: A reliable sewing machine is essential for stitching the bedspread efficiently. Ensure your machine has a straight stitch function, as well as adjustable stitch length and width. This allows for flexibility in creating different seam types.
- Scissors: A pair of sharp fabric scissors is crucial for precise cutting. Opt for scissors designed specifically for fabrics, as they provide a clean and smooth cut.
- Measuring Tape: A measuring tape is vital for accurate fabric measurements and ensuring that the bedspread fits your bed perfectly.
- Pins: Use safety pins to temporarily hold fabric pieces together before sewing. This ensures that the fabric is properly aligned and prevents it from shifting during the sewing process.
- Iron: An iron is helpful for pressing seams and removing wrinkles from the fabric, resulting in a polished and professional finish.
- Ironing Board: An ironing board provides a stable and padded surface for pressing fabric effectively. This ensures even heat distribution and prevents wrinkles from forming.
- Optional: Rotary cutter, quilting ruler, fabric marking pen, sewing machine foot for quilting or topstitching.
2. Taking Measurements and Cutting Fabric
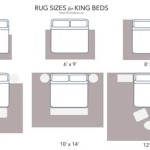
Accurate measurements are fundamental to creating a bedspread that fits your queen-size bed perfectly. Start by measuring the width and length of your mattress, adding a few extra inches for seam allowance and overhang. For a queen-size bed, a bedspread typically measures around 90 inches wide and 108 inches long.
Once you have the desired dimensions, carefully cut your fabric using sharp scissors. Remember to account for seams by adding an allowance of at least 1/2 inch around the edges. Cut two pieces of fabric, one for the top of the bedspread and one for the bottom. The top piece will be the decorative side, while the bottom piece will be the lining.
If you're adding embellishments like borders or quilting, measure and cut those pieces as well. Ensure that all pieces are cut accurately to avoid discrepancies in the final product.
3. Sewing the Bedspread
With the fabric pieces cut and ready, you can begin sewing your bedspread. Start by pinning the top and bottom pieces of fabric together, right sides facing, ensuring that the edges are aligned.
Using a sewing machine, stitch around the entire perimeter of the bedspread, leaving a small opening for turning. If you plan on quilting, stitch the quilting design before sewing the bedspread together.
Once the entire perimeter is sewn, carefully turn the bedspread right side out through the opening. Use a blunt object, such as a chopstick, to push out the corners and smooth out any wrinkles. Once the bedspread is completely turned, close the opening by hand-stitching it invisibly.
To add a decorative touch, consider topstitching around the edges of the bedspread. This involves sewing along the outer seams with a heavier thread or using a decorative stitch on your sewing machine.
4. Finishing Touches
Once the bedspread is sewn and turned, you can add finishing touches to create a perfect, customized piece. Press the entire bedspread with an iron, paying attention to the seams. This will ensure that the fabric is smooth and free of wrinkles.
If desired, add a border to the bedspread. This can be a contrasting fabric, ribbon, or trim. Use a sewing machine or hand-stitch the border onto the bedspread.
Lastly, wash and dry your bedspread according to the fabric care instructions. This will remove any lingering dust or fibers and ensure that it is ready for use.

How To Make The Bed For Home Staging Three Bears

Quilt Sizes The Most Popular Standard Dimensions To Make Your Quilts Sewguide

Bedduvit Blue Queen Size Quilt Set 100 Cotton Floal Striped Farmhouse Summer For Bed Reversible Lightweight Bedspread 3 Piece Bedding All Season 98 X90 Com

Exclusivo Mezcla Bed Quilt Set Queen Size For All Seasons Stitched Pattern Quilted Bedspread Bedding Coverlet With 2 Pillow Shams Lightweight And Soft Dark Grey Com

Shabby Chic Bedspread Set Queen Size Sewing Theme Border With On Floral Patch Traditional Lace Like Dots Print Quilted 3 Piece Decor Coverlet 2 Pillow Shams Multicolor By Ambesonne Com

Exclusivo Mezcla Bed Quilt Set Queen Size For All Seasons Stitched Pattern Quilted Bedspread Bedding Coverlet With 2 Pillow Shams Lightweight And Soft Dark Blue Com

Quilt Set Queen Size Black Bedspread Modern Style Quilted Clouds Pattern Soft

Chic Bedspread Coverlet Set Quilt For Double And Queen Size Bed 220x240cm Flower B M Catch Com Au

Freshfolds Multi Colored Pattern Full Queen Microfiber 3 Piece Quilt Set Bedspread Ec700424 The Home Depot

Queen Size Bedspread Block Booty Pattern