Queen Size Floating Bed DIY
A floating bed provides a unique, modern aesthetic, seemingly defying gravity with its minimalist design. Building a queen size floating bed frame is an achievable DIY project for those with intermediate woodworking skills and access to the necessary tools. This article details the steps and considerations involved in creating your own floating platform bed.
Planning and Preparation
Careful planning is crucial for a successful outcome. This includes accurate measurements, material selection, and tool preparation.
*Measurements:
Determine the precise dimensions for your queen size mattress (typically 60" x 80"). Add desired overhang to these measurements for the platform dimensions. *Material Selection:
High-quality lumber like plywood, solid wood, or MDF is appropriate for the platform. Consider the weight-bearing capacity of each material. *Tool Assembly:
Gather essential tools, including a circular saw, drill, measuring tape, level, screws, sandpaper, and safety glasses. *Budget:
Estimate the cost of materials and factor in any tool rentals or purchases. *Design Considerations:
Visualize the finished product, taking into account the height and overall aesthetic. Research different floating bed designs for inspiration.Building the Platform Frame
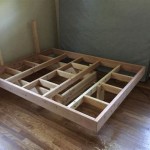
The platform frame serves as the foundation of the floating bed and must be sturdy and level.
*Cutting the Wood:
Cut the chosen wood to the predetermined dimensions for the platform frame. Ensure accurate cuts for a stable base. *Assembling the Frame:
Assemble the frame using screws and wood glue. Ensure square corners and a level surface throughout. Reinforce the frame with internal supports for added strength. *Center Support Beam:
Incorporate a central support beam running the length of the bed to prevent sagging and provide additional support for the mattress. *Adding Support Legs (Hidden):
The illusion of floating is achieved through strategically placed support legs. A central recessed support beam with legs can be used, or individual legs can be placed near the corners and edges of the platform. These should be shorter than the platform height, making them invisible when the bed is complete.Finishing and Installation
The final stage involves finishing the platform and preparing it for the mattress.
*Sanding:
Sand all surfaces of the platform for a smooth finish. This will also prepare the wood for staining or painting. *Finishing Touches:
Apply a stain, paint, or sealant to protect the wood and achieve the desired aesthetic. *Positioning:
Carefully position the platform in the desired location. Check for levelness and make adjustments as needed. Secure the hidden support legs to the floor for stability. *Mattress Placement:
Place the mattress directly on the platform. No box spring is required for a floating bed.Optional Enhancements
Consider these enhancements to elevate the design and functionality of your floating platform bed.
*Headboard:
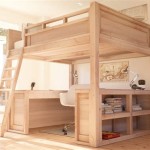
A headboard can be attached directly to the wall, independent of the floating platform, to maintain the floating effect. *Under-Bed Lighting:
Install LED strip lights underneath the platform to enhance the floating illusion and provide ambient lighting. *Built-in Storage:
Incorporate drawers into the design of the platform to maximize space and storage capacity. *Side Rails:
While not strictly necessary, low-profile side rails can be added for aesthetic purposes or to prevent items from rolling off the bed.Safety Considerations
Prioritize safety throughout the building process.
*Eye Protection:
Wear safety glasses when using power tools. *Proper Ventilation:
Ensure adequate ventilation when working with stains, paints, or sealants. *Weight Limits:
Consider the weight capacity of the materials used and avoid exceeding the recommended limit. *Secure Construction:
Ensure all screws are tightly fastened and joints are securely glued to prevent instability. *Electrical Safety:
If installing under-bed lighting, follow all electrical safety guidelines and ensure proper wiring.Maintenance
Regular maintenance will prolong the lifespan of the bed.
*Cleaning:
Dust and clean the platform regularly. *Inspection:
Periodically inspect the frame for any signs of wear and tear, loose screws, or damage. Tighten screws and repair any damage promptly. *Refinishing:
If the finish begins to show signs of wear, lightly sand and reapply the stain or sealant.Building a queen size floating bed is a rewarding DIY project that can add a touch of modern elegance to any bedroom. With careful planning, execution, and attention to detail, you can create a sturdy and stylish centerpiece for your room.

Diy Queen Size Floating Bed Howtospecialist How To Build Step By Plans Frame

Queen Size Diy Floating Bed Frame

How To Build A Diy Floating Bed For Queen Size Mattress Thediyplan

Queen Size Diy Floating Bed Frame

Diy Queen Size Floating Bed Howtospecialist How To Build Step By Plans Frame

Floating Queen Size Platform Bed Plans Howtospecialist How To Build Step By Diy Frame

Queen Size Floating Bed Plans

Floating Bed For Queen Size Mattress Thediyplan

Queen Size Diy Floating Bed Frame

Floating Queen Size Platform Bed Plans Howtospecialist How To Build Step By Diy Frame