Queen Size Wooden Bed Frame Plans: A Guide to Building Your Own
Constructing a queen size wooden bed frame is a rewarding DIY project that offers numerous benefits. From the satisfaction of crafting a unique piece of furniture to the potential cost savings compared to purchasing a pre-made frame, building your own bed can become a cherished accomplishment. This comprehensive guide provides a step-by-step approach to creating a sturdy and stylish queen size wooden bed frame, outlining the necessary materials, tools, and techniques to ensure a successful outcome.
Choosing the Right Wood for Your Bed Frame
The choice of wood for your bed frame is crucial, affecting both its durability and aesthetics. Consider the following factors:
- Strength and Stability: Hardwoods like oak, maple, and cherry are known for their strength and resistance to warping, making them excellent choices for bed frames.
- Appearance and Finish: Select a wood with a grain pattern and color that complements your bedroom décor. Pine and cedar offer a more rustic look, while walnut and mahogany provide a luxurious feel.
- Budget: Hardwoods tend to be more expensive than softwoods, so factor in your budget when making your decision.
Once you've chosen your wood, consider purchasing pre-cut lumber for ease of construction. This option eliminates the need for extensive cutting and ensures accurate measurements for your bed frame.
Essential Tools and Materials for Building Your Bed Frame
Before embarking on your DIY project, gather the following tools and materials:
- Lumber: Calculate the amount of lumber needed based on your bed frame design. The typical dimensions for a queen-size bed are 60 inches wide and 80 inches long.
- Wood Glue: Use a high-quality wood glue to ensure strong joints.
- Screws: Select screws that are appropriate for the thickness of your lumber.
- Wood Filler: Use wood filler to patch any gaps or imperfections in the wood.
- Sandpaper: Sand your bed frame smoothly before painting or staining.
- Paint or Stain: Choose your desired finish for the bed frame.
- Power Drill: A power drill with various drill bits will be essential for drilling pilot holes and securing screws.
- Measuring Tape and Level: Accurate measurements and level surfaces are crucial for a well-constructed bed frame.
- Circular Saw or Table Saw: A circular saw or table saw will be necessary for cutting lumber to size.
- Clamps: Clamps will help hold pieces together during assembly and ensure tight joints.
Step-by-Step Instructions for Building a Queen Size Wooden Bed Frame
Now that you have gathered all the necessary materials and tools, it's time to start building your bed frame. Follow these steps:
- Cut the Lumber: Begin by cutting the lumber to size according to your design. Double-check all measurements before making any cuts. Use a circular saw or table saw for precise cuts.
- Assemble the Headboard and Footboard: Based on your chosen design, assemble the headboard and footboard using wood glue and screws. Make sure the joints are strong and secure.
- Build the Side Rails: Cut and assemble the side rails, ensuring they fit snugly against the headboard and footboard. You might consider using dado joints or pocket holes for stronger connections.
- Attach the Side Rails to the Headboard and Footboard: Secure the side rails to the headboard and footboard using wood glue and screws. Use clamps to hold everything in place until the glue dries.
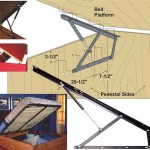
- Add Supports and Slats: Depending on the design, add supporting slats or beams to the bed frame. These provide additional stability and distribute the weight of the mattress evenly. You can purchase pre-made slats or build your own.
- Sand and Finish: Once the frame is assembled, sand it smooth using different grit sandpaper. This ensures a smooth surface for painting or staining.
- Apply Paint or Stain: Apply your chosen paint or stain to the bed frame, following manufacturer instructions. Allow ample drying time between coats.
- Install Mattress and Enjoy: After the finishing touches are complete, you can place your mattress on the bed frame and enjoy the fruits of your labor.
Remember to take your time and follow each step carefully. Ensure all joints are secure and the frame is properly aligned before proceeding to the next step.

Plans Queen Size Bed Plan Project Small Wood Projects From Scrap Frame Diy

Diy Bed Frame Wood Headboard 1500 Look For 200 A Piece Of Rainbow

Simple Queen Bed Frame Diy Plans

Queen X Barn Door Farmhouse Bed Plan Her Tool Belt

Diy Bed Frame Wood Headboard 1500 Look For 200 A Piece Of Rainbow

Essential Platform Bed Frame Ana White

Diy Bed Frame Plans How To Make A With Pete

Diy Bed Frame Plans How To Make A With Pete

Diy Bed Frame Wood Headboard 1500 Look For 200 A Piece Of Rainbow

Diy West Elm Chevron Bed Free Plans
Related Posts