Building a Wooden Queen Bed Frame: A Step-by-Step Guide
Building a wooden queen bed frame is a rewarding project that allows you to create a unique and personalized piece of furniture for your bedroom. This guide provides a comprehensive set of plans, covering all the necessary steps, from material selection to assembly. With careful planning and execution, you can construct a sturdy and stylish bed frame that will last for years to come.
Selecting the Right Materials
The materials used in building a queen bed frame significantly impact its durability, aesthetics, and overall cost. Consider the following factors when choosing materials:
-
Wood Type:
Hardwood like oak, maple, or cherry offers superior strength and a beautiful grain pattern. Softwoods like pine or cedar can provide a more affordable option, but they may require additional support for a queen-sized mattress. -
Wood Thickness:
The thickness of the lumber will determine the bed frame's structural integrity. For a queen bed frame, a minimum of 1x2 or 2x4 lumber is recommended. -
Hardware:
Choose durable and reliable hardware, such as screws, bolts, and corner brackets. -
Finish:
Consider the desired look and feel for the bed frame. Options include paint, stain, or a clear sealant.
Planning and Design
Before beginning construction, meticulously plan the design and dimensions of your queen bed frame. This stage is crucial for ensuring a successful outcome. Consider the following:
-
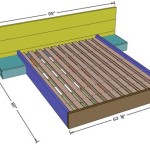
Overall Dimensions:
A standard queen mattress measures 60 inches wide by 80 inches long. Factor in the frame's width and height to accommodate the mattress and provide enough clearance for comfortable use. -
Height:
Determine the desired height of the headboard and footboard. Keep in mind the height of the mattress and your personal preferences. -
Style:
Choose a bed frame design that complements your existing bedroom decor. Explore traditional, modern, or minimalist styles. -
Storage:
Consider incorporating built-in storage solutions like drawers or shelves for added functionality.
Construction Steps
Once you have gathered the necessary materials and finalized the design, follow these steps for a successful bed frame construction:
-
Cut the Wood:
Use a circular saw, miter saw, or table saw to cut the lumber to the required dimensions. Ensure that the cuts are precise and square to avoid instability. -
Assemble the Headboard and Footboard:
Construct the headboard and footboard, ensuring adequate stability and strength. Consider using wood glue, screws, and corner brackets for reliable connections. -
Build the Side Rails:
Create sturdy side rails that will support the mattress. These rails should be longer than the bed frame width to accommodate the mattress and allow for proper fit and support. -
Attach the Headboard and Footboard to the Side Rails:
Securely connect the headboard and footboard to the side rails using sturdy hardware. Ensure these connections are strong enough to withstand the weight of the mattress. -
Add Additional Support:
If necessary, incorporate additional support beams or slats to ensure the bed frame can withstand the weight of a queen-sized mattress. This is especially important for softwoods. -
Sand and Finish:
Sand all the surfaces smoothly to remove any rough edges or imperfections. Choose a desired finish, such as paint, stain, or a clear sealant, and apply it evenly to the bed frame.
Key Considerations
Building a queen bed frame requires attention to detail and careful planning. Here are some key factors to consider throughout the process:
Safety Precautions
Always prioritize safety when working with power tools and potentially sharp materials. Wear safety glasses, protective gloves, and appropriate apparel. Use sturdy work surfaces and exercise caution when handling heavy lumber.
Finishing Touches
After the bed frame assembly is complete, consider adding finishing touches to enhance its aesthetic appeal. This may include:
-
Upholstery:
Incorporate fabric or leather to cover the headboard and footboard for a soft and luxurious feel. -
Hardware:
Use decorative hardware, such as knobs or handles, to add visual interest and functionality. -
Lighting:
Consider adding integrated lighting to the headboard for a touch of elegance.
Building a wooden queen bed frame from scratch is a challenging but rewarding project. By following these detailed plans and paying attention to key considerations, you can create a beautiful and durable piece of furniture for your bedroom. Remember to prioritize safety, enjoy the process, and be proud of your accomplishment.

Plans Queen Size Bed Plan Project Small Wood Projects From Scrap Frame Diy

Diy Bed Frame Wood Headboard 1500 Look For 200 A Piece Of Rainbow

Simple Queen Bed Frame Diy Plans

Diy Bed Frame Wood Headboard 1500 Look For 200 A Piece Of Rainbow

Essential Platform Bed Frame Ana White

Queen X Barn Door Farmhouse Bed Plan Her Tool Belt

Diy Bed Frame Wood Headboard 1500 Look For 200 A Piece Of Rainbow

Diy Bed Frame Plans How To Make A With Pete

Essential Platform Bed Frame Ana White
:max_bytes(150000):strip_icc()/apieceofrainbow-a4ac6d2cd6dc4b9694e33e80592b797f.jpg?strip=all "21 Diy Bed Frames You Can Build Right Now")
21 Diy Bed Frames You Can Build Right Now