How To Make A Queen Bed Frame Into King
Converting a queen bed frame into a king-sized bed is a cost-effective way to upgrade your bedroom. Rather than purchasing an entirely new bed frame, this DIY project allows you to utilize your existing frame and save money. While the process itself is relatively simple, it does require careful planning and execution to ensure a safe and sturdy final product. This article outlines the necessary steps and considerations for transforming your queen bed frame into a king-sized haven.
Measure and Plan
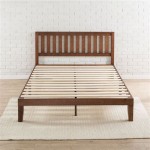
The first step is to accurately measure your existing queen bed frame and determine the necessary modifications. A queen bed frame typically measures 60 inches wide by 80 inches long, while a king-sized frame is 76 inches wide by 80 inches long. This means you need to add 16 inches to the width of your queen frame to achieve the desired king-size dimensions.
To ensure a stable and secure final product, it is crucial to have a detailed plan that outlines how you will make the necessary adjustments. Begin by sketching out the existing frame and its dimensions. Then, mark the areas where you will be adding the extensions and consider the materials you will be using. This planning step will save you time and effort in the long run, allowing you to accurately assess the materials needed and potentially identify any potential challenges beforehand.
Materials and Tools
The specific materials and tools you will need for this project depend on the construction of your existing bed frame and the chosen method of extension. However, some common tools and materials include:
- Wooden boards (2x4s or thicker, depending on the frame's weight and desired stability)
- Wood glue
- Screws (appropriate length and size for the wood used)
- Saw (miter saw or circular saw)
- Drill with driver bits
- Measuring tape
- Level
- Clamps
- Sandpaper
- Wood filler (optional, for filling gaps or imperfections)
- Paint or stain (optional, to match your existing frame or create a new look)
Before starting the project, ensure you have all the necessary tools and materials on hand. If your existing frame is made of metal, you may need to adapt the materials and tools accordingly. For example, you might use metal brackets or welding to add the necessary extensions.
Adding Extensions
Once you have gathered the necessary materials and tools, it's time to begin adding the extensions to your queen bed frame. The specific process will vary depending on the design of your existing frame. However, the general steps remain similar. Here are two common methods for adding extensions to a wooden bed frame:
Method 1: Side Extension
This method involves adding a side extension to each side of the frame. This can be achieved by creating two separate pieces of wood that will be attached to the existing side rails. First, measure the existing side rails and determine how much additional width you need (16 inches for a king bed). Then, cut two pieces of wood to match those dimensions. Next, attach the extensions to the existing side rails using wood glue and screws. Ensure the new pieces are securely attached and level before moving on.
Method 2: Center Extension
This method involves adding a central extension to the headboard and footboard. This can be achieved by creating a single piece of wood that will be attached to the existing head and footboard. You will first need to measure the width of your existing headboard and footboard and determine the position of the center extension. Cut a piece of wood matching the dimensions of the center extension you have planned. Then, attach this piece to the existing head and footboard using wood glue and screws. Ensure the new piece is securely attached and level before moving on.
Regardless of the method you choose, it is essential to use strong wood glue and ensure the screws are long enough to penetrate the wood and create a secure bond. Remember to pre-drill holes before driving screws into the wood to prevent splitting. Additionally, it is recommended to use clamps to hold the extensions in place until the glue dries completely. After the glue has dried, sand down the extensions to create a smooth finish that blends seamlessly with the existing bed frame.

Diy Bed Frame Wood Headboard 1500 Look For 200 A Piece Of Rainbow

Diy Bed Frame Wood Headboard 1500 Look For 200 A Piece Of Rainbow

Rebuild Headboard From King Size To Queen Woodworking

Diy Bed Frame Wood Headboard 1500 Look For 200 A Piece Of Rainbow

Diy Bed Frame Wood Headboard 1500 Look For 200 A Piece Of Rainbow

Diy Bed Frame Wood Headboard 1500 Look For 200 A Piece Of Rainbow

Chestwick Platform Bed Queen Size Frame Diy Plans

Simple King Size Platform Bed Frame American Hardwood Custom Made In Tennessee Queen Frames Murphy Plans Diy

Full Size Floating Bed Frame

Queen X Barn Door Farmhouse Bed Plan Her Tool Belt
Related Posts