Building a Queen Loft Bed Frame: A DIY Guide
A loft bed can transform a bedroom, offering a cozy sleeping space while maximizing floor area for a desk, seating, or even a play area below. Creating a queen loft bed frame is a rewarding DIY project that allows for personal customization and substantial cost savings. While the process requires time and dedication, the satisfaction of building a unique and functional piece of furniture is unparalleled.
Key Considerations Before Starting
Before embarking on your loft bed construction, there are several crucial factors to consider.
1. Space and Design
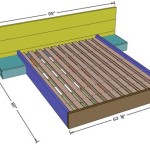
Firstly, carefully assess the available space in your bedroom. Consider the desired bed height and the surrounding furniture. Measure your existing queen mattress to ensure proper fit. Decide on the overall design - a simple frame or one incorporating storage drawers, a desk, or a bookshelf.
2. Materials and Tools
The choice of wood can significantly impact the loft bed's durability and appearance. Pine is a popular choice due to its affordability and light weight. However, hardwoods like oak or maple offer greater strength and longevity. Determine the necessary tools, including saws, drills, sanders, and a level.
3. Safety Precautions
Safety is paramount when constructing a loft bed. Ensure structural stability by using strong, well-secured supports. Utilize sturdy hardware and fasteners, and consider installing a ladder or steps for easy access.
Building the Frame
The frame construction involves several steps. Remember to consult detailed plans, adjust measurements to your specifications, and prioritize accuracy and precision.
1. Assembling the Base
Begin by constructing the bed base, often consisting of a rectangular frame. Cut the wood to size, ensuring the measurements are precise for a level and stable platform. Apply wood glue and secure the wooden pieces using screws or pocket-hole joinery.
2. Adding the Supports
Next, add the supporting beams, or posts, which create the loft effect. Utilize strong lumber and secure the posts to the base using brackets or reinforced corner joints. Double-check the verticality of the posts using a level. Consider adding additional support beams for greater stability, especially if the bed will be positioned against a wall.
3. Building the Ladder
The ladder is an essential component, allowing safe and convenient access to the bed. Measure the height of the frame and plan the ladder's dimensions accordingly. Cut lumber for the ladder rungs, connecting them to the side stringers using screws or dowel joints.
Finishing Touches
After completing the frame construction, focus on finishing touches. These steps improve the aesthetics and longevity of the loft bed.
1. Sanding and Staining
Sand the entire surface of the frame to create a smooth finish. Apply a primer before staining or painting, ensuring even coverage and improved adhesion. Choose a stain or paint color that complements your bedroom décor.
2. Adding Features
Finally, consider adding extra features like built-in storage, a headboard, footboard, or a desk. These enhance the functionality and personalized style of the loft bed. Remember to factor in the necessary size and placement of these features during the planning stage.
Building a queen loft bed frame is a challenging but rewarding project. With careful planning, attention to detail, and a commitment to safety, you can create a unique and functional piece of furniture that transforms your bedroom.

Multifunctional Queen Size Bunk Bed With Storage Area Plan Singapore

How To Build An Easy Diy Queen Size Loft Bed For S Thediyplan

Free Diy Furniture Plans How To Build A Queen Sized Low Loft Bunk Bed The Design Confidential

Loft Frame Simple Plans Available From Their Site Bed Queen Beds

How To Build A Loft Bed Free Plans Joinery Design Co

Diy Full Size Loft Bed For S With Plans To Build Your Own Simplified Building

Queen Loft Bed Plans

17 Easy Steps For A Diy Built In Bunk Bed Start At Home Decor

Diy Loft Bed

Diy Queen Loft Bed Frame Plans Rannels Rustic Log Build A Beds Murphy