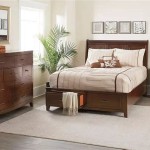
Queen Size Murphy Bed Plans Free: A Comprehensive Guide
For those seeking to maximize space in their homes, a queen-size Murphy bed offers an elegant solution. These transformative pieces of furniture seamlessly transition from a comfortable bed to a stylish wall unit, enhancing both functionality and aesthetics. While purchasing a pre-built Murphy bed can be expensive, constructing one from scratch using free plans allows for customization and significant cost savings. This article provides an in-depth guide on finding and utilizing free queen-size Murphy bed plans, empowering individuals to embark on their DIY journey.
A Wealth of Resources for Free Plans
The internet is a treasure trove of free plans for various projects, including Murphy beds. Numerous websites and online communities cater to DIY enthusiasts, offering detailed blueprints and instructions. Some prominent platforms known for their extensive collections include:
- Ana White: This popular website features a diverse range of free woodworking plans, including several Murphy bed designs. Ana White provides clear step-by-step instructions and detailed diagrams, making her plans suitable for beginners and experienced woodworkers alike.
- Instructables: This community-driven platform boasts a vast repository of user-submitted projects, including Murphy beds. Users can browse through a wide range of designs, each with its own set of instructions, materials list, and user reviews.
- Pinterest: This visual search engine is a valuable resource for finding inspiration and free plans. Search for terms like "free queen-size Murphy bed plans" or "DIY Murphy bed" to uncover a wealth of images and links to relevant websites and blog posts.
Essential Considerations for Choosing Plans
While free plans provide a valuable starting point, it's crucial to carefully choose plans that align with your specific needs and skill level. Consider the following factors:
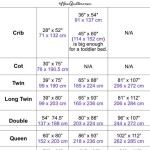
- Space Requirements: Measure the space where the Murphy bed will be installed to ensure the chosen plan utilizes the available dimensions effectively.
- Skill Level: Evaluate your woodworking expertise and choose plans accordingly. Beginner-friendly plans often involve simpler designs and fewer intricate steps, while advanced plans may require more experience and specialized tools.
- Materials and Costs: Compare the materials lists provided in different plans to understand the overall cost of construction. Research local lumber prices and consider alternative materials to minimize expenses.
- Design Preferences: Explore various designs to find one that complements your existing décor and meets your aesthetic preferences. Some plans offer built-in storage compartments, while others prioritize a minimalist appearance.
Tips for Success: Building Your Queen-Size Murphy Bed
Once you've selected a free plan, the next step is to carefully follow the instructions. Here are some tips to ensure a smooth and successful construction process:
- Read the Plans Thoroughly: Before starting, review the entire set of plans, familiarizing yourself with each step, material requirement, and tool usage. This will help you anticipate potential challenges and identify any necessary adjustments.
- Gather the Necessary Tools and Materials: Compile all the tools and materials listed in the plans before you begin. Having everything readily available will streamline the construction process and prevent delays.
- Take Your Time and Be Precise: Murphy beds involve intricate components and precise cuts. Take your time, measure carefully, and use high-quality tools to ensure accurate results.
- Seek Help if Needed: Don't hesitate to seek assistance from experienced woodworkers or online communities if you encounter any difficulties. There are many resources available to guide you through challenging steps or answer specific questions.
- Test and Adjust: Before assembling the final product, test the fit and function of individual components. This will allow you to make any necessary adjustments and ensure a smooth operation of the finished bed.
By embracing the DIY approach, you can create a custom queen-size Murphy bed that perfectly suits your space and style. With careful planning and a commitment to meticulous craftsmanship, you can transform your home while realizing significant cost savings. Remember, the journey of building your own Murphy bed is as rewarding as the final product itself.

Free Diy Furniture Plans How To Build A Queen Sized Murphy Bed The Design Confidential

Plans A Murphy Bed You Can Build And Afford To Ana White

Free Diy Furniture Plans How To Build A Queen Sized Murphy Bed The Design Confidential

Free Diy Furniture Plans How To Build A Queen Sized Murphy Bed The Design Confidential

Queen Size Murphy Bed Hardware Kit Horizontal Sideways Easy Diy

How To Build A Gorgeous Diy Murphy Bed Using Hardware Kit Plans

Rustic Queen Sized Wall Bed Ana White

Horizontal Queen Size Kit Easy Diy Murphy Bed Hardware

Vertical Murphy Bed Kit

Diy Murphy Bed Tutorial And
Related Posts