Building a Queen Loft Bed Frame: A Comprehensive Guide
A loft bed, particularly a queen-sized one, offers a unique solution for maximizing space in any bedroom. It creates a cozy sleeping haven up high while providing a functional area underneath for various purposes, from a workspace to a play area. Building a queen loft bed frame is a rewarding project that allows you to create a custom piece of furniture perfectly tailored to your preferences and needs. This article will guide you through the process of constructing a sturdy and stylish queen loft bed frame, covering essential steps, material choices, and valuable tips for a successful build.
Planning and Design
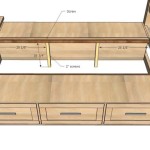
Before starting any woodworking project, careful planning is essential. This includes determining the overall dimensions of the loft bed, considering the available space, and deciding on the desired style. The most important dimensions are the bed platform itself, which should ideally be the same size as a standard queen mattress (60" x 80"), and the height of the loft. The chosen height should allow for comfortable headroom for the person sleeping in the loft, as well as sufficient clearance underneath for the intended use.
Additionally, consider the construction of the frame. A simple ladder-style frame offers a straightforward build, while a more elaborate design with built-in storage options or a desk can enhance functionality. Sketching out the design and creating a detailed plan with measurements will help you visualize the final product and ensure that you have all necessary materials and tools before you begin.
Material Selection
The choice of materials will affect the overall strength, durability, and aesthetic of your queen loft bed frame. For the frame itself, consider using sturdy lumber like pine, oak, or maple. These woods are readily available, affordable, and can be easily worked with. For the bed platform, plywood is a common choice due to its strength and stability. Choose a thickness of at least 3/4" for optimal support. Plywood is also available in various finishes, allowing you to create a unique look for your bed frame.
For the ladder, you can use the same type of lumber as the frame or opt for a different material like metal for a more contemporary look. Remember to choose materials that are compatible with your chosen design and construction techniques. Additionally, consider using pre-drilled lumber or holes to make the assembly process smoother and more accurate.
Construction Process
Once you have gathered all the necessary materials and tools, you can start building the queen loft bed frame. The construction process typically involves the following steps:
- Cut all lumber to size: Using a saw, cut the lumber according to the measurements specified in your plan. Ensure all cuts are precise and at the right angles for a stable frame.
- Assemble the frame: Using wood glue and screws, connect the pieces of lumber to form the main frame structure. Start by building the rectangular platform frame that will support the plywood base. Then, build the vertical supports for the loft and attach them securely to the platform.
- Construct the ladder : Cut the rungs and side supports for the ladder and assemble them according to your design. Ensure that the ladder is securely attached to the frame.
- Attach the plywood base : Fix the plywood sheet to the frame, ensuring that it is centered and level. Use countersunk screws to avoid damaging the surface.
- Sand and finish : Once the frame is assembled, sand all surfaces to create a smooth and even finish. Then, apply a stain, paint, or varnish to protect the wood and add a desired aesthetic.
Safety Considerations
When building a loft bed, safety is paramount. Here are some key points to consider for a safe and stable construction:
- Use sturdy materials and construction techniques: Ensure that the lumber and hardware you use are strong enough to support the weight of the bed and the person sleeping on it.
- Secure all joints and fasteners: Use wood glue, screws, or bolts to create strong and durable connections between all parts of the frame.
- Check for stability : Once the frame is assembled, test its stability by carefully applying pressure to different areas. Make sure that it does not wobble or shake.
By following these steps, you can successfully build a sturdy and functional queen loft bed frame that will provide a safe and comfortable sleeping space for years to come.

Queen Loft Bed Plans

Free Diy Furniture Plans How To Build A Queen Sized Low Loft Bunk Bed The Design Confidential

Loft Frame Simple Plans Available From Their Site Bed Queen Beds

How To Build A Loft Bed Free Plans Joinery Design Co

How To Build A Queen Size Loft Bed Homesteady Diy Frame Plans

Diy Full Size Loft Bed For S With Plans To Build Your Own Simplified Building

17 Easy Steps For A Diy Built In Bunk Bed Start At Home Decor

Diy Queen Loft Bed Frame Plans Rannels Rustic Log Build A Beds

Diy Loft Bed

Multifunctional Queen Size Bunk Bed With Storage Area Plan