DIY Horizontal Murphy Bed Plans: A Guide to Space-Saving Sleep
In the realm of home design, maximizing space is paramount. For those with limited square footage, a Murphy bed, also known as a wall bed, presents an ingenious solution. This ingenious piece of furniture seamlessly transforms from a cozy slumber haven to a sleek wall fixture, liberating valuable floor space for various activities. While commercially available Murphy beds can be pricey, DIY enthusiasts can embark on a fulfilling project and craft their own horizontal Murphy bed, a space-saving marvel that blends functionality with aesthetic appeal.
This comprehensive guide will equip you with the necessary knowledge and step-by-step instructions, empowering you to build your own horizontal Murphy bed. From selecting materials to assembling the frame, hinges, and support mechanisms, this article will provide a clear roadmap to bring your vision to life. With a little patience, precision, and a dose of DIY spirit, you can construct a custom Murphy bed that perfectly complements your home's decor and enhances your living space's versatility.
Understanding the Horizontal Murphy Bed Design
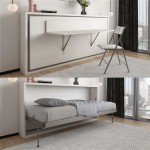
A horizontal Murphy bed hinges horizontally, meaning it folds flat against the wall, unlike a traditional vertical Murphy bed that folds upwards. This design offers distinct advantages, particularly when incorporating a headboard. The horizontal configuration allows for a more substantial headboard, which can serve as a decorative focal point, adding character and depth to the room. Furthermore, the horizontal mechanism enables easier access to the bed, eliminating the need to maneuver over a bulky headboard or footboard.
The construction of a horizontal Murphy bed typically involves a sturdy frame that supports the mattress, a hinge mechanism that enables the bed to fold and unfold, and a supporting bracket for stability. The frame can be crafted from various materials like wood, metal, or a combination of both, depending on your desired aesthetic and structural requirements. The hinges, often chosen for their durability and ease of movement, play a crucial role in ensuring smooth and reliable operation of the bed. The supporting bracket securely fixes the bed to the wall, providing necessary stability and preventing any unwanted movement.
Essential Materials and Tools
Before embarking on your construction journey, it is crucial to gather the essential materials and tools. This comprehensive list will ensure a smooth and efficient building process:
- Wood: The frame of your Murphy bed can be constructed using various types of wood, such as plywood, pine, or oak. Choose materials that suit your aesthetic preferences and structural requirements.
- Hinges: Heavy-duty hinges, ideally with a minimum of three hinges, are essential for supporting the weight of the bed and ensuring smooth operation. Consider using industrial-grade hinges for prolonged durability and longevity.
- Supporting Bracket: A sturdy bracket, often made of metal or wood, is necessary to firmly attach the bed to the wall. The bracket should be robust enough to withstand the weight of the bed and its occupant. Consider using a wall stud for additional support.
- Screws: A variety of screws will be required for assembling the frame, securing the hinges, and attaching the bracket to the wall. Choose screws appropriate for the types of materials used and the weight they will bear.
- Hardware: Depending on the design of your Murphy bed, you may need additional hardware, such as bolts, nuts, washers, and dowels, for reinforcing joints and ensuring stability.
- Mattress: Select a mattress that complements the size and dimensions of your Murphy bed. Consider a thinner mattress to facilitate folding and unfolding more easily.
- Measuring Tape: Precision is key in building a Murphy bed. A measuring tape is essential for accurately determining the dimensions of the frame, hinges, and supporting bracket.
- Level: Ensure that your Murphy bed is correctly aligned and level. A level will guarantee stability, preventing the bed from tilting or wobbling.
- Saw: A saw is crucial for cutting wood to size and creating the frame. Choose a saw appropriate for the types of wood you are working with.
- Drill: A drill is necessary for creating pilot holes for screws and assembling the frame. A drill with multiple bits will provide versatility for drilling holes in various materials.
- Screwdriver: A screwdriver is essential for tightening screws during the assembly process. Consider using a magnetic screwdriver to prevent screws from falling and ensure a secure fit.
- Safety Glasses: Protecting your eyes is crucial when working with tools. Always wear safety glasses when drilling, cutting, or using power tools.
- Dust Mask: Woodworking projects can generate dust. Wear a dust mask to protect your respiratory system from inhaling wood particles.
Step-by-Step Construction Guide
Once you have gathered the necessary materials and tools, you can begin constructing your horizontal Murphy bed. Follow these detailed steps for a successful build:
- Plan and Design: Before diving into construction, carefully plan your Murphy bed design. Determine the desired dimensions to ensure it perfectly fits your space and accommodates your preferred mattress size. Sketch out the frame design, considering factors such as headboard size, storage options, and desired aesthetic.
- Build the Frame: Cut the wood to the dimensions determined in the planning phase. Assemble the frame using screws, glue, or dowels. Ensure all joints are strong and secure, as the frame must support the weight of the bed and its occupants.
- Attach the Hinges: Select a sturdy location on the frame for attaching the hinges. Mark and drill pilot holes before securing the hinges using screws. The type of hinges used will influence the attachment process. Consult the manufacturer's instructions for specific guidance.
- Install the Supporting Bracket: Locate the supporting bracket's position on the wall. Ensure that the bracket is securely attached to a wall stud for maximum support. Use appropriate screws and anchors to ensure a strong and stable connection.
- Mount the Bed to the Wall: Attach the bed frame to the supporting bracket using the hinges. Test the operation of the bed ensuring smooth folding and unfolding, and adjust hinges or brackets as needed.
- Add Finishing Touches: Once the bed is functional, add any finishing touches, such as a headboard, storage shelves, or decorative trim. These embellishments can enhance the bed's aesthetic appeal and personalize its design.
- Safety Checks: Before using your newly built Murphy bed, perform safety checks to ensure all components are secure. Test the folding and unfolding mechanisms to ensure smooth operation.
- Enjoy Your New Murphy Bed: With your DIY horizontal Murphy bed complete, you can now enjoy the benefits of space-saving design. Its versatility and functionality will transform your living space, freeing up valuable floor area for various activities.
Expert Tips for Building Success
While crafting a Murphy bed may seem daunting, embracing these expert tips can streamline the process and enhance the quality of your creation:
- Prioritize Safety: Always prioritize safety when working with tools and materials. Wear appropriate safety gear, such as safety glasses and a dust mask, and use tools with caution.
- Measure Twice, Cut Once: Accurate measurements are crucial for building a well-fitting Murphy bed. Take your time, measure twice, and cut once to avoid mistakes.
- Use Sturdy Materials: Opt for high-quality wood and hardware to ensure your Murphy bed's longevity and structural integrity.
- Seek Professional Guidance: If you encounter complex construction challenges, seek professional guidance from a carpenter or contractor. Their expertise can prevent mistakes and guarantee a safe and successful build.
- Customize to Your Needs: Tailor your Murphy bed to your specific needs and preferences. Consider adding features like integrated storage units, a built-in nightstand, or a custom headboard to enhance its functionality and aesthetic appeal.

Diy Horizontal Murphy Bed Woodbrew

Vertical Murphy Bed Kit

Horizontal Queen Size Kit Easy Diy Murphy Bed Hardware

Queen Size Murphy Bed Hardware Kit Horizontal Sideways Easy Diy

Woodworking Plans Murphy Bed Free Horizontal Modern Beds Diy

Murphy Bed Ana White

Diy Twin Murphy Beds Without Expensive Hardware The Awesome Orange

Diy Murphy Bed How To Easily Build In Just 15 Simple Steps

15 Diy Murphy Beds How To Build A Bed

Hardware Kit For Horizontal Mount Murphy Bed Interiors Designed Com Ideas De Cama Diseño Muebles Para Casa