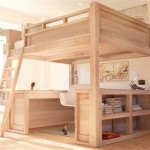
DIY Twin Bunk Bed Plans: A Guide for Building a Safe and Stylish Sleep Space
Creating a bunk bed is a fantastic way to maximize space and provide a fun and functional sleeping area for children or guests. With the right plans and materials, you can build a sturdy and safe bunk bed that fits your style and budget. This article outlines the essential steps involved in constructing a DIY twin bunk bed.
Choosing the Right Plans and Materials
The first step in building a bunk bed is selecting the appropriate plans and materials. Numerous online resources offer free or paid DIY bunk bed plans, each with its own design and complexity.
Here are some crucial factors to consider when choosing plans:
- Skill level: Choose plans that align with your woodworking experience. If you are a beginner, opt for simple designs with straightforward instructions.
- Space requirements: Measure the available space for the bunk bed, including ceiling height, and select a plan that fits comfortably.
- Style preference: Consider your desired aesthetic. Choose plans that offer the desired look and feel, ranging from rustic to modern.
Regarding materials, the most common options for DIY bunk bed construction are:
- Wood: Pine is a budget-friendly and readily available option, while hardwoods like oak or maple offer durability and a more refined look.
- Hardware: Choose sturdy screws, bolts, and brackets to ensure the safety and stability of the bunk bed.
- Finishing materials: Paint, stain, or varnish can be used to personalize the bunk bed's appearance and protect the wood.
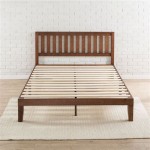
- Mattresses: Select twin-sized mattresses that fit the dimensions specified in the plans.
Building the Bunk Bed Frame
Once the plans and materials are gathered, you can start building the bunk bed frame. This is where the chosen plans become essential, as they provide step-by-step instructions for assembling the structure.
Here's a general guideline for building the frame:
- Cut the wood: Use a saw to cut the lumber according to the plan's measurements.
- Assemble the bed frames: Connect the side rails, headboards, and footboards of both the upper and lower beds using screws, bolts, or dowels, as specified in the plans.
- Install the bunk supports: Attach the supporting structures that hold the upper bed, such as vertical posts or beams, to the lower bed frame. These supports are critical for overall stability and safety.
- Add safety features: Incorporate safety elements, such as guardrails, ladder, and bunk bed slats, to ensure the bed is secure and comfortable to use.
Finishing Touches and Installation
After building the frame, you can add finishing touches to enhance the bunk bed's style and protect the wood. These steps can include:
- Sanding: Smooth the wood surfaces to create a smooth and even finish.
- Finishing: Apply paint, stain, or varnish to achieve the desired look and protect the wood from wear and tear.
- Installation: After the finishing touches are complete, install the bunk bed in its intended location. Ensure it is on a level surface and securely attached to the wall, if applicable.
When building a bunk bed, remember to double-check the plans' instructions, especially the safety guidelines. Ensure that the frame is strong enough to support the weight of the mattresses and occupants. Consider adding safety features such as guardrails, ladder, and bunk bed slats to ensure a secure and comfortable sleeping experience.

2x4 Bunk Bed Rogue Engineer

Twin Over Full Bunk Bed Plans Size Toddler Diy Nederland

2x4 Bunk Bed Rogue Engineer

Simple Bunk Bed Plans Twin Over Full Ana White

2 4 And 6 Twin Bunk Bed Plan Jays Custom Creations

Diy Built In Bunk Beds Lauren Koster Creative

Free Woodworking Plans To Build An Rh Inspired Kenwood Twin Over Bunk The Design Confidential

Bunk Bed Plans

Bunk Beds Plan How To Build Full Instruction For Diy Double With Drawers

Farmhouse Style Twin Over Full Bunk Bed Plans Her Tool Belt
Related Posts