How to Build a Queen Size Bed Frame with Headboard and Storage
Building a queen-size bed frame with a headboard and storage can be a rewarding DIY project. It allows for customization, saves money compared to buying a pre-made frame, and adds a unique personal touch to your bedroom. This guide outlines the steps and considerations involved in creating your own bed frame, ensuring a sturdy and functional piece of furniture.
Planning and Material Selection
The first step is to carefully plan the bed frame design. Consider the desired height, headboard style, and storage options. Draw a detailed sketch to visualize the finished product and determine necessary materials.
Essential materials include: *
Wood:
Choose a strong, durable wood like pine, oak, or maple. You can use pre-cut lumber or purchase planks and cut them yourself. *Hardware:
Include wood screws, wood glue, corner brackets, and any specific hardware needed for the chosen storage system. *Fasteners:
For the bed frame, consider using strong metal brackets or connecting hardware. *Paint or Stain:
Select your desired finish to match your bedroom decor.Constructing the Bed Frame
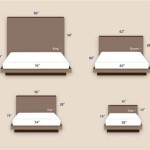
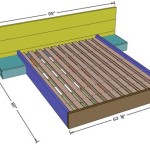
Begin by assembling the frame's foundation. For a queen-size bed, the frame should be 60 inches wide and 80 inches long. Cut the wood planks to size and use wood glue and screws to secure them together, creating a rectangular base.
Once the base is built, create the headboard using plywood or solid wood. The headboard's size and shape are determined by the desired style. Consider adding decorative elements like molding or carving. Ensure the headboard is sturdy and can support its own weight.
Next, attach the headboard to the base. Depending on the design, you might need to create posts or side rails to connect the headboard to the frame. Use strong metal brackets or connecting hardware for secure attachment.
Incorporating Storage
There are various storage solutions to integrate into the bed frame. Popular options include:
Under-bed drawers:
These can be built from plywood and fitted with drawer slides. Make sure they are easily accessible and have adequate clearance below the mattress.
Hidden compartments:
Create hidden compartments within the headboard or footboard. These are ideal for storing items like blankets, pillows, or books.
Open shelves:
Add open shelves to the headboard or footboard for displaying items or keeping frequently used items within reach.Remember to properly measure and cut the storage components to ensure they fit seamlessly into the bed frame.
Finishing Touches and Assembly
After assembling the frame, sand the surfaces to create a smooth finish. Apply paint or stain according to your preference and allow it to dry completely.
Attach the slats or a slatted platform to support the mattress. Ensure adequate spacing between the slats to prevent mattress sagging.
Finally, attach the mattress, pillows, and bedding to complete your custom bed frame. Be sure to measure the mattress dimensions beforehand to ensure it fits perfectly within the frame.

Diy Full Or Queen Size Storage Bed Shanty 2 Chic

How To Build A Queen Size Storage Bed Addicted 2 Diy

Queen Size Platform Bed Frame With Storage Drawers Sawdust Girl

Diy Storage Bed Printable Woodworking Plans And Tutorial

Queen X Barn Door Farmhouse Bed Plan Her Tool Belt

Diy Bed Frame Wood Headboard 1500 Look For 200 A Piece Of Rainbow

Queen X Barn Door Farmhouse Bed Plan Her Tool Belt

Diy Bed Frame Wood Headboard 1500 Look For 200 A Piece Of Rainbow

Diy Storage Bed Projects The Budget Decorator

Platform Bed Frame Plans Howtospecialist How To Build Step By Diy
Related Posts