How To Build A Wall Bed Frame
A wall bed frame, also known as a Murphy bed, is a space-saving solution for small apartments, guest rooms, or home offices. By folding away into a wall cabinet when not in use, it frees up valuable floor space during the day. While purchasing a pre-built wall bed frame is an option, building one yourself can be a rewarding and cost-effective project. This guide will provide a step-by-step approach to building a sturdy and functional wall bed frame.
1. Designing and Planning Your Wall Bed Frame
The first step in building a wall bed frame is to carefully plan and design it to fit your space and needs. Consider the following factors:
- Dimensions: Measure the available wall space and determine the bed's desired dimensions, including the size of the mattress and the depth of the frame.
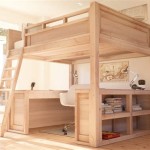
- Storage Needs: Decide if you want to incorporate storage shelves, drawers, or a desk into the wall bed unit.
- Material: Choose the materials for the frame, considering factors like strength, weight, and aesthetics. Plywood, MDF, and particle board are common choices.
- Hardware: Identify the necessary hardware for assembling the frame, including hinges, brackets, supports, and fastening mechanisms.
Once you have a clear understanding of your requirements, create a detailed design plan, including diagrams and lists of materials and hardware.
2. Assembling the Frame and Support Mechanism
With the design finalized, gather the materials and start assembling the frame:
- Cut the frame pieces: Using a saw, carefully cut the plywood, MDF, or particle board according to your design plans.
- Assemble the frame: Join the frame pieces using screws, glue, or a combination of both. Ensure the frame is strong and stable.
- Build the support mechanism: Construct the mechanism that will lift and lower the bed frame. This can be a simple system of hinges and brackets or a more complex gas-spring assisted system.
- Attach the bed frame to the support mechanism: Securely attach the bed frame to the support mechanism, ensuring it is properly aligned and balanced.
Test the support mechanism to ensure it operates smoothly and securely.
3. Installing the Wall Bed Frame
Once the frame is complete and the support mechanism is functional, it is time to install the wall bed frame:
- Prepare the wall: Locate the studs in the wall and mark their positions. If necessary, reinforce the wall to support the weight of the bed frame.
- Mount the frame: Secure the frame to the wall using brackets, screws, or other appropriate fasteners. Ensure the frame is level and securely attached.
- Install the storage components: If you included storage shelves, drawers, or a desk in your design, assemble and install these components according to your plans.
- Add finishing touches: Paint or stain the frame to match your desired aesthetic. Install door handles, decorative hardware, and any other desired finishing elements.
After installation, test the bed frame to ensure it functions as intended and is stable.

How To Build A Gorgeous Diy Murphy Bed Using Hardware Kit Plans

Diy Murphy Bed For Under 150 With Plans Your Modern Family Wall Build A

Diy Murphy Bed How To Easily Build In Just 15 Simple Steps

Woodsmith Murphy Bed Plans Wilker Do S

Rustic Queen Sized Wall Bed Ana White

Diy Murphy Bed Tutorial And

Kits Wallbeds By Wilding

Diy Murphy Bed For Under 150 With Plans Your Modern Family

Homemade Murphy Bed Built In Wall Diy Project Homesteading Tiny House Furniture

Vertical Murphy Bed Kit