Queen Pallet Bed Frame DIY
Building a queen-size bed frame from pallets offers a cost-effective and environmentally conscious approach to furnishing a bedroom. This project allows for customization and can be adapted to various skill levels. This guide provides a comprehensive overview of constructing a queen pallet bed frame.
Materials Required:
The primary material is, of course, wooden pallets. Six to eight standard-sized pallets are typically sufficient for a queen bed frame. The exact number depends on the desired height and headboard design. Ensure the pallets are heat-treated (HT) rather than chemically treated (MB) for safety. Other necessary materials include:
- Measuring tape
- Pencil
- Safety glasses
- Work gloves
- Crowbar
- Hammer
- Saw (reciprocating saw recommended)
- Sander (orbital sander preferred)
- Screws (wood screws, 3-inch)
- Drill with appropriate drill bits
- Wood sealant or paint (optional)
- Level
Preparing the Pallets:
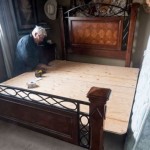
Thorough preparation is crucial for a stable and aesthetically pleasing bed frame. Begin by cleaning the pallets with a brush and soapy water. Once dry, inspect them for loose nails or damaged wood. Remove or repair any compromised sections. Disassembling the pallets is often easier for creating specific cuts and ensuring a smooth surface. Use a crowbar and hammer to carefully separate the boards. This process may require patience and can be time-consuming.
Cutting and Sanding:
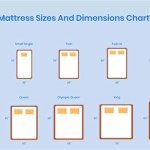
Measure the dimensions of a standard queen-size mattress (60 inches wide by 80 inches long) to determine the required frame size. Cut the pallet boards to the appropriate lengths using a saw. A reciprocating saw is recommended for its versatility in cutting through nails and thicker wood. Once cut, sand all surfaces thoroughly to remove splinters and rough edges. An orbital sander significantly speeds up this process and provides a smoother finish.
Assembling the Frame:
The basic frame consists of two long side rails and two shorter end rails. Lay out the cut boards according to the desired dimensions. Use wood screws and a drill to securely fasten the boards together. Pre-drilling pilot holes prevents the wood from splitting. For added stability, consider adding center support beams running the length of the frame. These beams can rest on additional pallet slats or blocks, providing extra support for the mattress.
Creating the Base:
The base supports the mattress and can be constructed in two primary ways. The first method involves attaching slats directly to the frame rails. Cut the slats to fit within the frame and space them evenly. The second method utilizes a solid platform made from plywood or additional pallet boards. This provides a more uniform surface but requires a larger piece of material. Secure the base to the frame using screws.
Headboard (Optional):
A headboard adds a finished look and can be easily incorporated into the design. Utilize remaining pallet wood to create a headboard that complements the frame. Consider designs ranging from a simple panel to more intricate patterns. Attach the headboard securely to the frame using screws and reinforcing brackets if necessary.
Finishing Touches:
Once assembled, inspect the entire frame for stability and address any loose connections. Applying a wood sealant or paint protects the wood and enhances the aesthetic appeal. Choose a finish that complements the bedroom décor. Allow ample drying time before placing the mattress on the frame.
Safety Considerations:
Prioritize safety throughout the entire construction process. Wear appropriate safety gear, including safety glasses and work gloves. Exercise caution when using power tools and ensure the work area is well-ventilated. Always disconnect power tools when not in use. Be mindful of sharp edges and protruding nails. Double-check all connections to ensure the frame is stable and can support the weight of the mattress and occupants.
Customization:
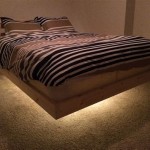
One of the advantages of building a pallet bed frame is the flexibility for customization. Consider adding features such as under-bed storage drawers or built-in lighting. The height can be adjusted by adding additional layers of pallets. Incorporate unique design elements to reflect personal style and preferences. Research different pallet bed frame designs for inspiration and adapt them to suit individual needs.

The Queen Pallet Bed Frame Diy

Diy Pallet Bed Frame Queen Size

The Queen Pallet Bed Beds Co

Diy Wood Projects How To Create Your Own Queen Pallet Bed Frame

Diy Pallet Bed Frame Guide And Tutorial

7 Steps To Building A Bed With Reclaimed Pallets

Diy Queen Size Pallet Bed With Headboard

The King Size Pallet Bed Home Of Original Beds

Diy 20 Pallet Bed Frame Ideas

35 Lovely Wooden Pallet Bed Ideas With Led Lights In 2024 Frame Diy Design
Related Posts