Simple Bed Base DIY
Building a bed base is a manageable DIY project that can save money and allow for customization. This article outlines several approaches for constructing a simple, sturdy bed base using readily available materials and tools.
Pallet Bed Base
Using repurposed pallets is a cost-effective and environmentally friendly way to create a bed base. This method requires minimal woodworking skills.
- Source pallets: Find sturdy, undamaged pallets. Check for heat treatment markings (HT) to ensure they haven't been chemically treated.
- Clean and prepare: Thoroughly clean the pallets with soap and water. Sand down any rough edges or splinters.
- Disassemble (optional): If desired, disassemble the pallets for greater customization. This allows for rearranging the wood and creating a specific size or design.
- Assemble the base: Arrange the pallets side-by-side to create the desired bed size. Secure them together using screws or bolts.
- Add support (optional): For added stability, consider adding crossbeams beneath the pallets, particularly for larger bed sizes.
- Finish: Sand the entire base smooth and apply a finish such as paint, stain, or varnish for protection and aesthetics.
Simple Wooden Frame Bed Base
This method involves constructing a basic frame using lumber, offering more control over dimensions and design than the pallet method.
- Measure and plan: Determine the desired bed dimensions and calculate the required lumber lengths.
- Gather materials: Purchase lumber (2x4s or 2x6s are commonly used), screws, wood glue, and finishing materials.
- Cut the lumber: Cut the lumber to the calculated lengths for the frame sides and support beams.
- Assemble the frame: Connect the side rails and head/footboards using screws and wood glue, creating a rectangular frame.
- Add support beams: Install center support beams running the length of the frame to prevent sagging. These should rest on additional support legs.
- Attach support legs: Secure legs to the corners and center support beam(s) for stability.
- Finish: Sand the frame and apply a desired finish.
Metal Frame Bed Base
A metal frame offers a strong and lightweight foundation. This method requires basic metalworking skills and tools.
- Plan and measure: Determine the bed dimensions and calculate the lengths of metal needed.
- Gather materials: Acquire metal tubing (square or rectangular), corner brackets, screws, and finishing materials (optional).
- Cut the metal tubing: Cut the tubing to the appropriate lengths for the frame sides and support beams.
- Assemble the frame: Connect the metal tubing pieces using corner brackets and screws.
- Add support beams: Install center support beams and legs, similar to the wooden frame method.
- Finish (optional): Apply a rust-resistant primer and paint for added protection and aesthetics.
Storage Bed Base
Incorporating storage into the bed base maximizes space utilization. This can be achieved with either a wooden or metal frame.
- Build the basic frame: Follow the steps for either the wooden or metal frame construction.
- Plan storage compartments: Determine the desired storage configuration (drawers, shelves, or lift-up access).
- Construct storage components: Build drawers or shelves using appropriate materials and hardware or install a lift-up mechanism.
- Integrate storage: Incorporate the storage components into the bed base frame.
Platform Bed Base
A platform bed base provides direct support for the mattress, eliminating the need for a box spring. This can be constructed using wood or a combination of wood and metal.
- Build the frame: Construct a rectangular frame using either wood or metal, as described in previous methods.
- Add support slats: Install closely spaced wooden slats across the frame to support the mattress. These are typically thinner pieces of wood, like 1x4s.
- Ensure proper spacing: Maintain consistent spacing between slats for even mattress support. The spacing should be no more than 3 inches apart.
Upholstered Bed Base
An upholstered bed base adds a touch of elegance and provides a soft perimeter. This method requires basic upholstery skills.
- Build a wooden frame: Construct a standard wooden frame as outlined previously.
- Cut and attach padding: Cut foam padding to fit the frame sides and headboard, securing it with adhesive or staples.
- Cover with fabric: Stretch upholstery fabric over the padding, stapling it securely to the frame. Ensure a taut and wrinkle-free finish.
Considerations for all Bed Base Types
Regardless of the chosen method, consider the following factors:
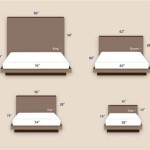
- Mattress size: Ensure the base dimensions correspond to the mattress size.
- Room dimensions: Plan the bed base size in relation to the available room space.
- Weight capacity: Consider the combined weight of the mattress, occupants, and bedding when selecting materials and construction methods.
- Height: Determine the desired bed height, taking into account personal preference and aesthetic considerations.

Forward Thinking Furniture Very Simple Bed Frame Diy Bedroom

A Simple Diy Bed Frame Intentional Living

10 Awesome Diy Platform Bed Designs The Family Handyman

Simple Queen Bed Frame Diy Plans

A Simple Diy Bed Frame Intentional Living
:max_bytes(150000):strip_icc()/apieceofrainbow-a4ac6d2cd6dc4b9694e33e80592b797f.jpg?strip=all "21 Diy Bed Frames You Can Build Right Now")
21 Diy Bed Frames You Can Build Right Now

This Minimal House Diy Minimalism Home Improvement
:max_bytes(150000):strip_icc()/themerrythought-27ef4fb4fd1f442ab082ae79e53ff934.jpg?strip=all "21 Diy Bed Frames You Can Build Right Now")
21 Diy Bed Frames You Can Build Right Now

Simple Bed Twin Size Ana White

How To Build A Platform Bed With Legs For 50 Diy Frame Twin
Related Posts